Initiatives in Jira Cloud: How to Enable, Create & Use Them (2026 Guide)

There is a specific moment in every scaling company's life when Epics stop working.
I saw this with a client just last month. Their backlog wasn't a prioritized list anymore; it was a parking lot of 400 unconnected Epics. The CTO couldn't see the big picture because everything was flattened into the same tier. They didn't need a new project; they needed a new altitude.
Need Initiatives configured properly across multiple projects?
I set these up for clients in a single Quick Fix session. Hierarchy, permissions, the right field config
If your Epics are too big to be manageable but too small to justify a whole new Jira Project, you are missing the most critical layer in the Jira hierarchy: The Initiative.
⚠️ Note on Interface: The video above walks through the logic using an older version of Jira. The core concepts are identical, but I have updated the step-by-step guide below to match the current 2026 Jira Cloud "Plans" interface.
This guide covers everything you need to know about Initiatives in Jira Cloud: what they are, how they differ from Epics, how to enable and create them, and how to actually use them effectively. I've also included the common mistakes I see teams make after 14 years of consulting.
New to Jira? Start with my Jira Crash Course first, then come back here when you've outgrown Epics.
Let's fix your hierarchy.
What is a Jira Initiative?
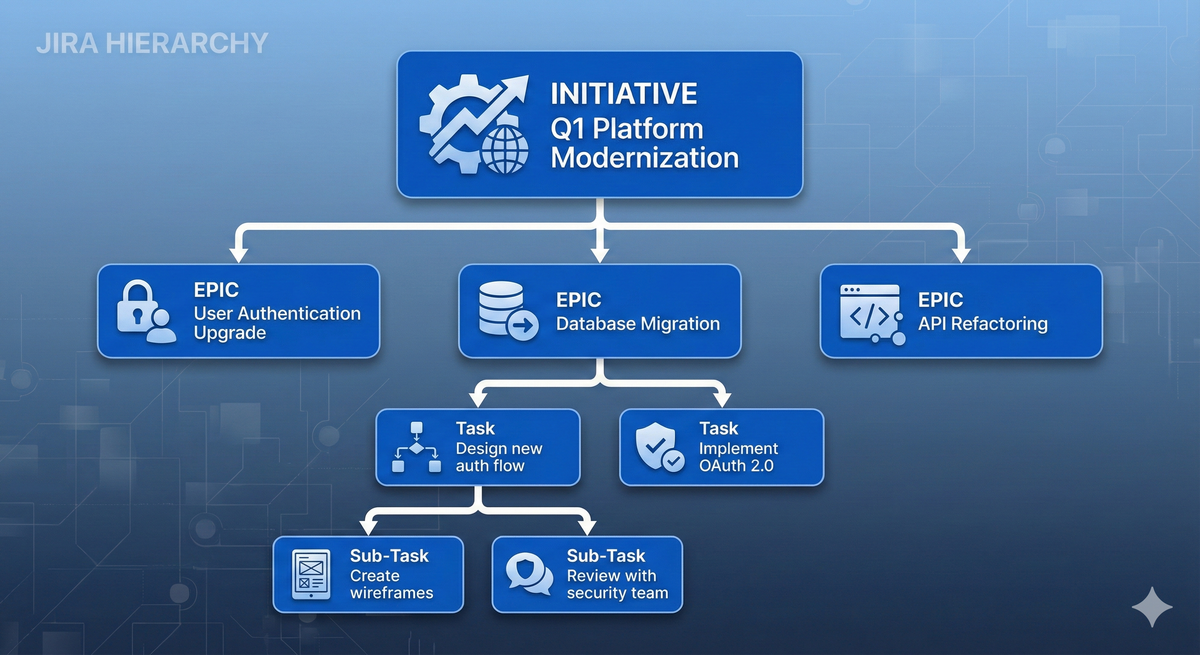
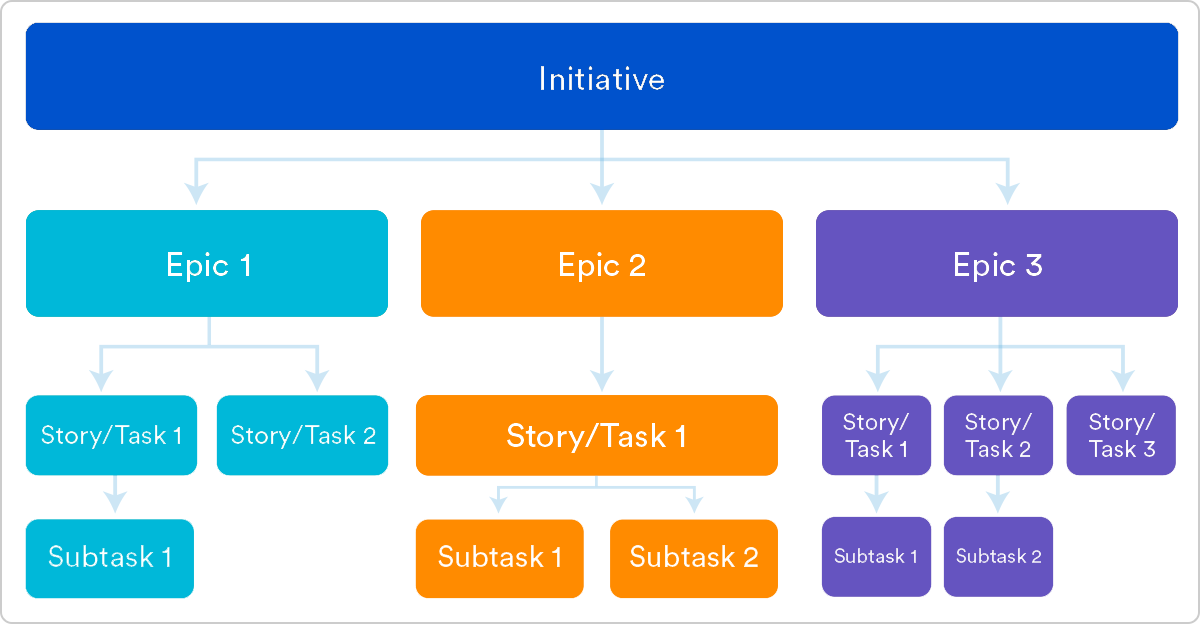
An Initiative is the highest standard level in the Jira hierarchy. It sits above Epics and acts as a container for related bodies of work.
Think of it this way:
- A Story is a single piece of work (days)
- An Epic groups related Stories (weeks to months)
- An Initiative groups related Epics (quarter to year)
The CTO I mentioned earlier? His 400 Epics weren't random - they fell into about 12 distinct strategic goals. Those goals were his missing Initiatives. Once we added that layer, the roadmap made sense again.
The Jira Hierarchy:
Initiative     → "Launch Mobile App" (Q2-Q3 goal)
  └── Epic     → "User Authentication" (6 weeks)
       └── Story   → "Build login screen" (3 days)
            └── Sub-task → "Design login form" (4 hours)
Without Initiatives, everything above Epic-level becomes invisible. Your strategic goals live in spreadsheets, Confluence pages, or (worst case) someone's head. Initiatives bring that layer into Jira where it can be tracked, prioritized, and visualized alongside the actual work.
Initiative vs Epic: What's the Difference?
This is the question I get most often. Here's the breakdown:
| Initiative | Epic | |
|---|---|---|
| Time horizon | Quarter to year | Weeks to months |
| Contains | Multiple Epics (3-8 typically) | Stories and Tasks |
| Visibility | Executive/roadmap level | Team/sprint level |
| Example | "Launch Mobile App" | "User Authentication Module" |
| Requires | Jira Premium (Plans) | Any Jira plan |
| Who manages it | Product leadership | Delivery team |
The practical difference: Epics are for the team. Initiatives are for stakeholders.
When a VP asks "what's the status of the mobile app?" - they don't want to hear about 47 individual Epics. They want one Initiative with a progress bar and a target date.
When your developers ask "what should I work on this sprint?" - they don't care about Initiatives. They need Epics broken into Stories they can pick up.
My rule of thumb: If it takes more than a quarter and involves multiple teams or workstreams, it's an Initiative. If it's a focused body of work one team can deliver in weeks, it's an Epic.
The Prerequisite: You Need Premium
Before you start clicking, a reality check: the custom hierarchy features we're building today require Jira Cloud Premium (formerly known as "Portfolio" or "Advanced Roadmaps").
While you can hack a Work Item type called "Initiative" in the Standard plan, you'll lose the ability to visualize the parent/child relationships. Without the "Plans" feature, your Initiative is just another ticket floating in the void.
What Premium gives you:
- Custom hierarchy levels (Initiative, Theme, etc.)
- Plans view with timeline visualization
- Parent-child relationships above Epic level
- Progress rollups from child issues
- Cross-project roadmaps
If you're on Standard and need this visibility, talk to your Atlassian account rep about Premium. In my experience, the hierarchy features alone justify the upgrade for teams with 50+ Epics.
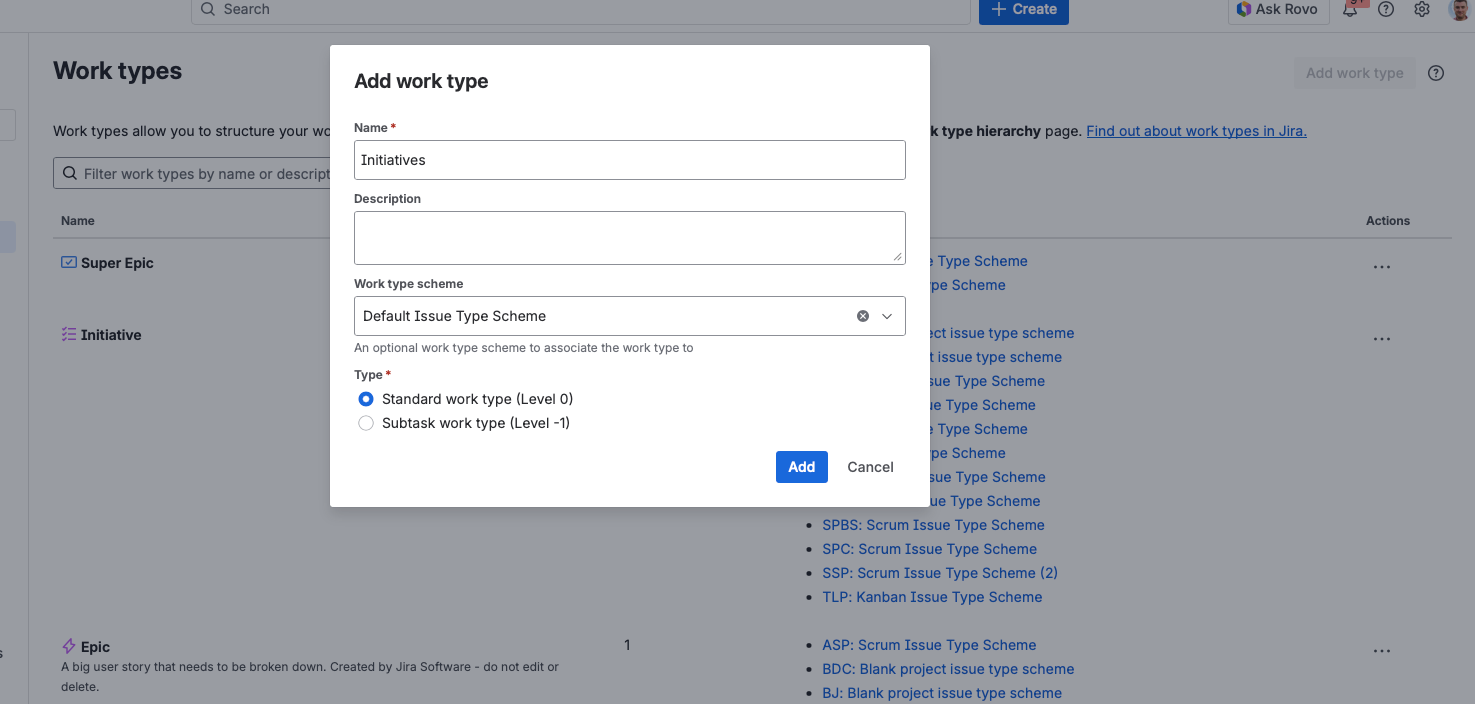
Step 1: How to Create an Initiative Work Item (Issue Type)
By default, Jira stops at the Epic level. We need to manually tell Jira that a new container exists.
Need Initiatives configured properly across multiple projects?
I set these up for clients in a single Quick Fix session. Hierarchy, permissions, the right field config
- Go to Settings (the cog icon) → Work Item
- Select Work types and click Add Work type
- Name it Initiative
- Add a description: "Strategic goal grouping multiple Epics"
Pro Tip: Use a distinct icon (like the purple shield or the large roadmap icon) so it stands out visually on the board against purple Epics. This small detail helps users instantly recognize the hierarchy level.
Step 2: How to Enable Initiatives in Your Hierarchy
Creating the issue type isn't enough; you have to tell Jira where it sits in the food chain.
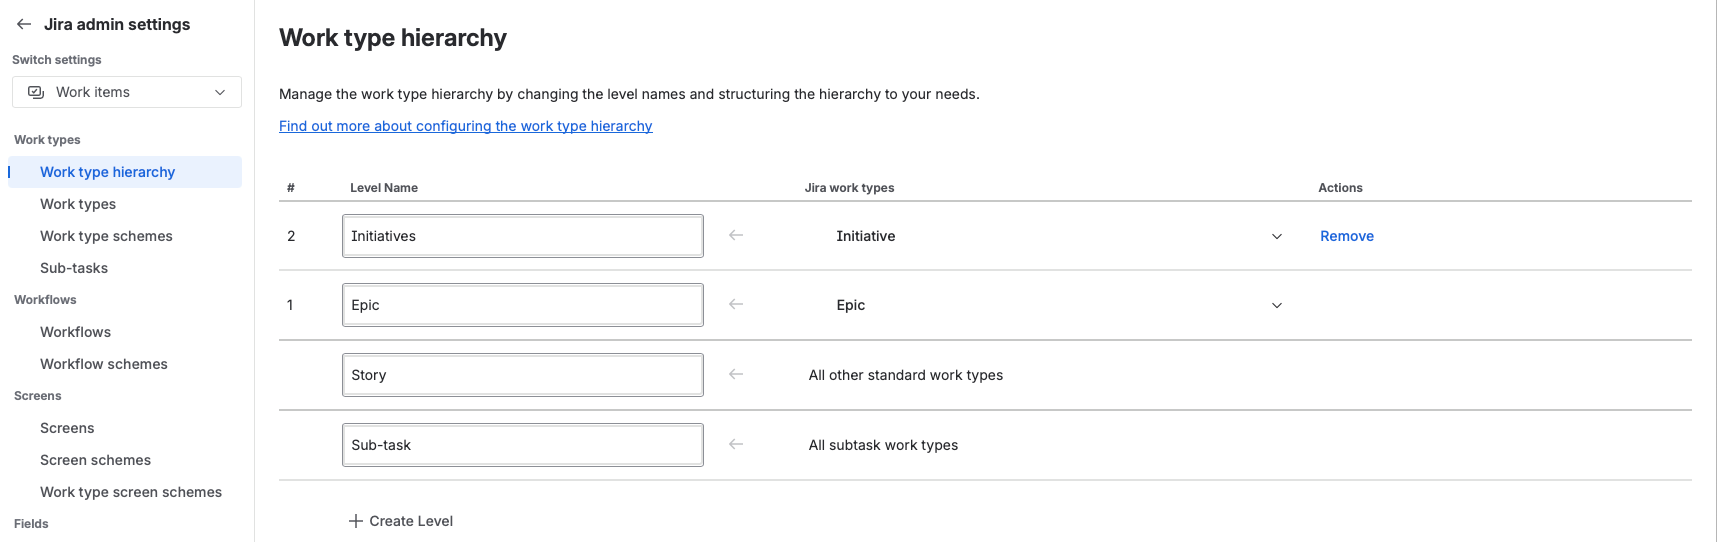
- Go to Settings → Products
- On the left sidebar, look for Plans → Hierarchy configuration
- Click + Create Level
- Name the level Initiative and map your new "Initiative" Work Item type to this level
- Ensure it is placed above the Epic level
You can create multiple hierarchy levels if needed. Some enterprise teams add "Theme" above Initiative, or "Feature" between Epic and Initiative. But for most teams, Initiative → Epic → Story is plenty.
Keep it simple. I've seen teams create 6 hierarchy levels and then wonder why nobody uses them. Start with one level above Epic and add more only when you have a real need.
Step 3: How to Link Epics to Initiatives (The Step Most Admins Miss)
This is the step most admins miss. If you don't expose the specific linking field, you won't be able to connect an Epic to an Initiative.
- Go to Settings → Work Item → Screens
- Find the Default Screen (or the specific screen scheme used by your project)
- Add the field called Parent Link
Important: Do not confuse this with the standard "Parent" field used for Subtasks. You specifically need Parent Link for hierarchies above Epic.
If you skip this step, your team will create Initiatives and Epics but have no way to connect them. I get support calls about this constantly.
Verification: After adding the field, create a test Epic. You should see a "Parent Link" field where you can search for and select an Initiative.
Step 4: How to Use Initiatives in Jira Plans
Now that the plumbing is connected, you can build the view.
Plans is the visualization layer that makes Initiatives useful. I cover it in depth in my Jira Plans guide - it's the killer feature of Premium.
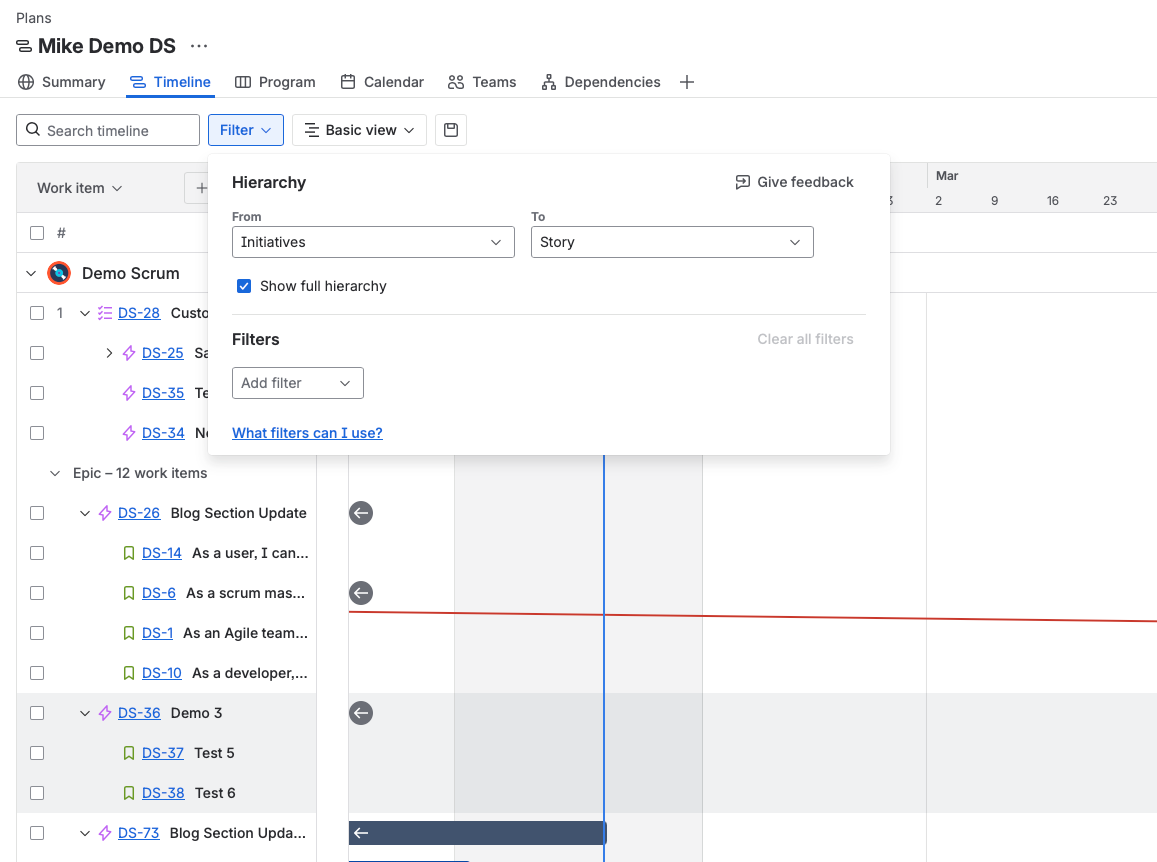
- Navigate to Plans in the top menu and create a new Plan
- Select Filter
- Make sure that Initiatives are selected
The power of Plans: Once set up, you can:
- See progress rollups (Initiative shows % complete based on child Epics)
- Visualize dependencies between Initiatives
- Filter by team, label, or any field
- Share roadmap views with stakeholders
- Expand/collapse hierarchy levels
A Note on Visibility: The new List View updates (2025/2026) have made this much easier to manage. You can now expand/collapse these hierarchies right from the navigator without going into Plans. This is a significant improvement for day-to-day use.
The Consultant's Take
Technically, setting this up takes 10 minutes. Strategically, most teams get it wrong.
I often see teams trying to use Initiatives as "Buckets" for random work (e.g., "Marketing Initiatives" or "Tech Debt"). This is a mistake.
Initiatives work best when treated as Mini-Projects. They are for bodies of work that are:
- Too big to be an Epic - it will take more than a quarter to finish
- Too small to be a dedicated Jira Project - it doesn't need a separate workflow or permission scheme
- Have a clear end state - "Launch Mobile App" not "Ongoing Improvements"
The Bucket Trap: If your Initiative doesn't have a target completion date, it's not an Initiative - it's a category. Use Labels or Components for categorization instead.
The Scope Creep Trap: If your Initiative keeps growing and never finishes, it's too big. Split it into phases: "Mobile App Phase 1: MVP" and "Mobile App Phase 2: Premium Features".
The 400-Epic client? We created 12 Initiatives. Within a week, the CTO could finally see the roadmap. Within a month, they'd reprioritized two Initiatives based on visibility they'd never had before.
Want Initiatives properly wired into your roadmap and Plans?
I build this end-to-end for clients — usually inside a single Implementation Sprint
Frequently Asked Questions
Can I use Initiatives without Jira Premium?
Technically yes - you can create an "Initiative" issue type on any Jira plan. I've seen teams do this.
But here's the problem: without Premium's Plans feature, you can't visualize the parent-child relationships. Your Initiative becomes just another ticket floating in the backlog. You lose the timeline view, the progress rollups, and the ability to drag Epics under Initiatives.
If you're on Standard, I'd recommend using Labels or Components to group related Epics instead. It's not as elegant, but at least it's visible.
How many Epics should an Initiative contain?
In my experience, 3-8 Epics is the sweet spot.
- Fewer than 3? You probably don't need an Initiative - just use an Epic.
- More than 8? Consider splitting into two Initiatives, or you've got scope creep.
The client I mentioned had one Initiative with 23 Epics under it. That's not an Initiative - that's a program. We split it into 4 focused Initiatives, each with 5-6 Epics, and suddenly progress was trackable again.
What's the difference between Initiatives and Themes?
Themes are for categorization - they're like tags. "Security", "Performance", "Customer Experience" are themes.
Initiatives are for deliverables - they have a start, an end, and a definition of done. "Launch SOC 2 Compliance Program" is an Initiative that might be tagged with the "Security" theme.
You can use both together. One Initiative can have multiple themes, and one theme can span multiple Initiatives.
Why can't I see the Parent Link field?
This is the #1 support question I get after teams set up Initiatives.
The Parent Link field is not the same as the Parent field used for subtasks. It's a separate field specifically for hierarchy levels above Epic.
To fix it:
- Go to Settings → Issues → Screens
- Find your project's screen scheme
- Add the Parent Link field to the relevant screens
If you still can't see it, check that you're using a company-managed project. Team-managed projects handle hierarchy differently.
Should I use Initiatives or create separate Jira Projects?
This is the key decision. Here's my framework:
Use an Initiative when:
- The work shares the same workflow as your other work
- The same team (or overlapping teams) will deliver it
- It doesn't need separate permissions
- It's temporary (has an end date)
Use a separate Project when:
- It needs a completely different workflow
- It requires separate permissions (different stakeholders)
- It's ongoing/permanent (like "Support" or "Infrastructure")
- A different team owns it entirely
The client with 400 Epics? They were creating new Projects for everything. They had 47 Projects. We consolidated to 8 Projects with Initiatives, and suddenly cross-project visibility became possible.
The key factor? Workflows. If teams need completely different workflows, separate projects make sense. If workflows are similar, use Initiatives.
Struggling with this in your organization? I help teams of 50-500+ get their Atlassian stack working properly
How do I track Initiative progress?
In Plans, Initiative progress is calculated automatically based on child issues. You'll see:
- Progress bar showing % of child issues completed
- Status rollup based on child issue statuses
- Date tracking if you've set start/end dates
For more detailed tracking, I recommend adding a few custom fields to your Initiative issue type:
- Target Quarter (dropdown)
- Business Sponsor (user picker)
- Success Metrics (text field)
This turns your Initiative into a lightweight project charter.
Consultant Insights
"Initiatives are for visibility, not control." The goal isn't to add another layer of bureaucracy. It's to give leadership a view they couldn't see before.
"If your Initiative has more than 8 Epics, it's probably a Program." Split it. Smaller Initiatives are easier to track and more likely to actually ship.
"Most teams set up Initiatives and then forget to use them." The setup takes 10 minutes. The discipline to maintain them is the hard part. Update your Initiatives weekly or they become stale.
"I've never seen a team regret adding Initiatives. I've seen plenty regret not having them." When you hit 50+ Epics, you'll wish you'd started earlier.
What's Next?
If you're just getting started:
- Create the Initiative issue type (5 minutes)
- Configure the hierarchy level (2 minutes)
- Add Parent Link to your screens (3 minutes)
- Create your first Initiative and link 3-5 existing Epics to it
- Open Plans and see the magic
If you're inheriting a mess:
- Export your Epic list
- Group them into logical Initiatives (aim for 8-12 Initiatives max)
- Create Initiatives for each group
- Link existing Epics to their parent Initiatives
- Archive or close Epics that no longer make sense
The goal isn't a perfect hierarchy. The goal is visibility. When your CTO can see the roadmap without opening a spreadsheet - that's success.
Questions? Pushback? Something you'd handle differently? Drop it in the comments below — I read and reply to every single one.