Jira API Tutorial: Create, Read, and Update Tickets Without Touching Jira


Here's something most people don't realize: You don't need to be a developer to use the Jira API. With AI tools and simple clients like Postman, even non-technical people are automating Jira workflows today.
Why am I teaching you this? After 14+ years consulting, I use the API constantly:
- Testing automations before deploying them
- Verifying field configurations work correctly
- Preparing for integrations with other systems
- Understanding how Jira actually structures data
- Bulk operations that would take hours manually
The reality: Most people are intimidated by APIs. They shouldn't be. This is simpler than you think.
Need a custom Jira API integration but don't have a dev on the team?
I build these for clients regularly — Postman, Python, n8n, whatever fits your stack
Why You Should Learn Jira API (Even If You're Not Technical)
Let me give you real scenarios where API knowledge saves massive time:
Scenario 1: Testing Complex Automations
You're building an automation with 15 custom fields. Instead of clicking through the UI 50 times to test it, use the API to create test tickets in 30 seconds.
Another common API use case: transitioning issues through workflow statuses in bulk. My Workflow Guide covers the workflow concepts you'll need.
Scenario 2: Verifying Field Configurations
Client asks: "Can we populate Due Date, Priority, and 5 custom fields when creating tickets?" One API call tells you instantly what's possible.
Scenario 3: Understanding Jira's Data Structure
Custom fields have cryptic IDs like customfield_10047. GET a ticket via API and see exactly how Jira stores your data. This is reverse engineering made easy.
Scenario 4: Preparing for Integrations
Your company wants to integrate Salesforce with Jira. Knowing the API means you can plan the integration, test it, and communicate requirements to developers.
Scenario 5: Bulk Operations
Need to add the same comment to 100 tickets? API + simple script = done in minutes instead of hours.
Bottom line: API knowledge isn't just for developers. It's a power tool for admins, consultants, and power users.
Want to take API automation even further? ScriptRunner's HAPI lets you write the same operations in a fraction of the code.
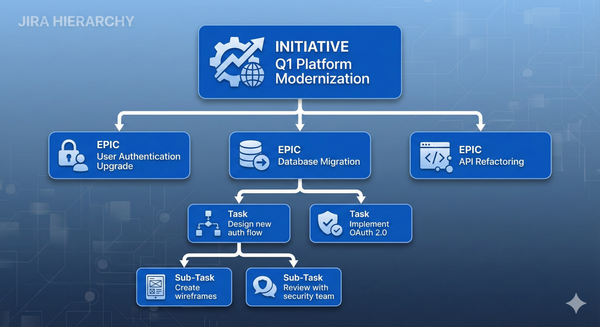
When working with complex Jira hierarchies, you may need to update parent links in bulk. This is especially useful when reorganizing Initiatives and Epics
across your projects.
What We're Building Today
By the end of this tutorial, you'll know how to:
- ✅ GET ticket information - See how Jira structures data
- ✅ POST (create) tickets - With standard AND custom fields
- ✅ PUT (update) tickets - Add comments, change status, update fields
- ✅ Use Postman - The easiest API client for non-developers
- ✅ Understand JSON - The data format Jira uses
No coding experience required. If you can follow a recipe, you can do this.
Step 1: Get Your API Token (Required)
Before making any API calls, you need authentication credentials.
For Jira Cloud (Most Common)
Important 2026 Update: Atlassian now requires time-limited API tokens. You can't create tokens that never expire anymore. Maximum duration varies by plan.
To create your API token:
- Log into your Jira Cloud instance
- Click your profile picture (top right)
- Select Profile
- In the left sidebar, click Personal Access Tokens
- Click Create Token
- Give it a name: "API Testing" or "Postman Access"
- Set expiration: 30, 60, 90 days, or maximum allowed
- Click Create
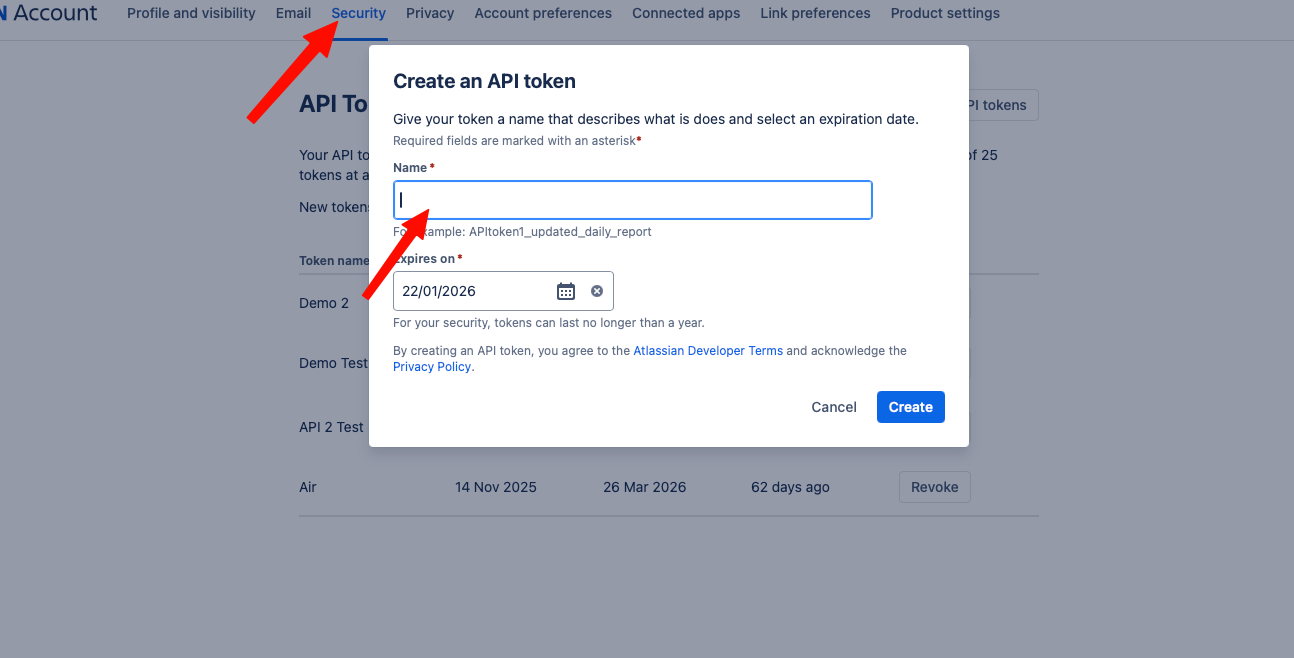
Where to save it: Paste it into a password manager or secure note. You'll need it in Step 3.
For Jira Data Center/Server
The process is nearly identical:
- Profile → Personal Access Tokens
- Create Token
- Copy immediately
- Save securely
Pro tip: Create separate tokens for different purposes (testing, production integrations, automation). If one gets compromised, you can revoke it without breaking everything.
Want a working integration in a week, not three months?
scope and deliver Jira API integrations as focused Implementation Sprints — production-ready, with handover docs.
Step 2: Install Postman (Your API Client)
What is Postman? Think of it as a web browser specifically designed for APIs. Instead of visiting websites, you make API calls.
Why Postman?
- ✅ Free for individual use
- ✅ Visual interface (no command line needed)
- ✅ Built-in JSON formatting
- ✅ Saves your requests for reuse
- ✅ Works on Windows, Mac, Linux
Download and Install (You can also use the web based version)
- Go to postman.com/downloads
- Download the desktop app (recommended) or use web version
- Install and create a free account
- Open Postman
Alternative: If you prefer command line, you can use curl. But for this tutorial, I'm using Postman because it's more visual and forgiving.
Step 3: Configure Postman for Jira
Now let's set up Postman to talk to your Jira instance.
Create a New Request
- In Postman, click the + button to create a new request
- You'll see a blank request template
Set Up Authentication
This is where you'll use that API token from Step 1.
- Click the Authorization tab
- In the "Type" dropdown, select Bearer Token
- Paste your API token in the "Token" field
- Leave everything else as default
Why Bearer Token? It's the modern, secure way to authenticate. Username/password still works, but tokens are better practice.
Save Your Request
- Click Save (top right)
- Name it: "Jira - Get Ticket"
- Create a new collection: "Jira API Tutorial"
- Click Save
Now you're ready to make your first API call.
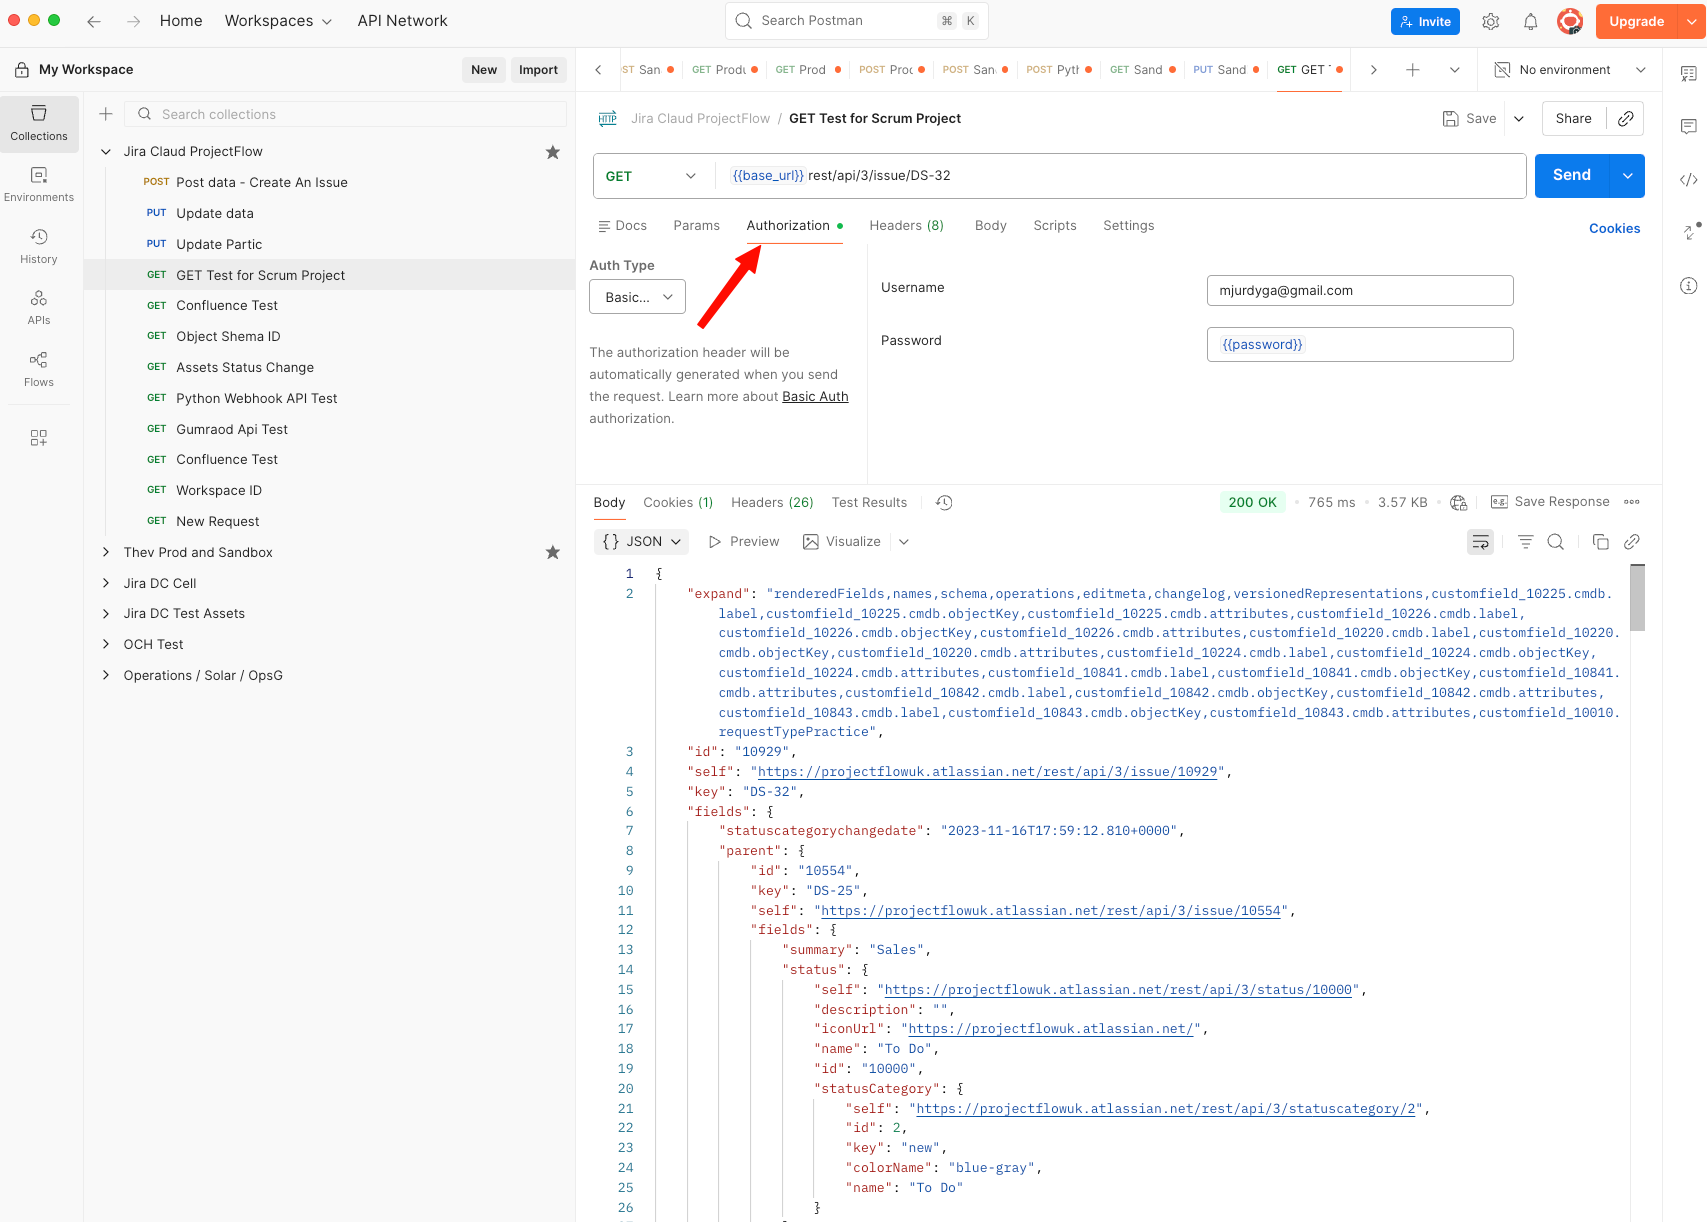
Step 4: Your First API Call - GET a Ticket
Let's start simple: retrieve information about an existing Jira ticket.
Find a Ticket to Test With
- Go to your Jira instance
- Open any ticket (e.g., PROJ-123)
- Note the ticket key (the part like "PROJ-123")
Build the GET Request
Back in Postman:
- Ensure GET is selected in the method dropdown
- In the URL field, enter:
https://your-domain.atlassian.net/rest/api/3/issue/PROJ-123
Replace:
your-domainwith your actual Jira subdomainPROJ-123with your actual ticket key
For Jira Data Center:
https://your-jira-domain.com/rest/api/2/issue/PROJ-123
- Click Send

Understanding the Response
If successful, you'll see a 200 OK status and a large JSON response.
Can't see the response body? In Postman, there's a divider you can drag up to reveal the response section.
Click "Pretty" to format the JSON nicely.
What You're Looking At
The response shows how Jira stores this ticket:
{
  "id": "10024",
  "key": "PROJ-123",
  "fields": {
    "summary": "Fix login page",
    "description": "Users can't login...",
    "status": {
      "name": "In Progress"
    },
    "priority": {
      "name": "High"
    },
    "assignee": {
      "displayName": "John Smith"
    },
    "created": "2025-12-15T09:30:00.000+0000",
    "customfield_10047": "Customer value here"
  }
}
Key observations:
Standard fields like summary, status, priority have readable names.
Custom fields have cryptic IDs like customfield_10047. This is normal.
Understanding how custom fields work is essential for API work. See my Custom Fields Masterclass for how to find field IDs and understand field contexts.
Dates are in ISO 8601 format.
Objects like status and assignee contain nested information.
Why This Matters (Reverse Engineering)
This is the secret weapon. When you want to know:
- What's the custom field ID for "Sprint"?
- How does Jira store priority?
- What format does Due Date need?
Just GET an existing ticket that has those fields populated. You'll see exactly how Jira expects the data.
Example: You need to set a custom field via automation but don't know its ID. GET a ticket that has that field filled in, search the JSON for the field name or value, and you'll find the ID.
Step 5: Create a Ticket (POST) - Basic Version
Now let's create a ticket using the API.
Create a New Request
- In Postman, click + for new request
- Change method from GET to POST
- Enter URL:
https://your-domain.atlassian.net/rest/api/3/issue
Set Up the Request Body
- Click the Body tab
- Select raw
- In the dropdown on the right, select JSON
The Simplest Possible Ticket
Here's the absolute minimum JSON to create a ticket:
{
  "fields": {
    "project": {
      "key": "PROJ"
    },
    "summary": "Test ticket created via API",
    "issuetype": {
      "name": "Task"
    }
  }
}
Replace:
PROJwith your actual project keyTaskwith your issue type (Task, Story, Bug, etc.)
Why so simple? Jira only requires:
- Project
- Summary
- Issue Type
Reporter is automatic (uses your API token's user).
- Paste this JSON into the Body section
- Click Send
Success Response
If it works, you'll see 201 Created and a response like:
{
  "id": "10125",
  "key": "PROJ-456",
  "self": "https://your-domain.atlassian.net/rest/api/3/issue/10125"
}
Copy that ticket key (PROJ-456) and check it in Jira. Your ticket exists!
Common Errors
400 Bad Request - "project is required"
→ Check your JSON syntax. Missing comma? Wrong brackets?
400 Bad Request - "Issue type is not valid"
→ The issue type name doesn't match. Try "Story" or "Bug" instead of "Task"
401 Unauthorized
→ Your API token is wrong or expired. Generate a new one.
404 Not Found
→ Check your URL. Is the project key correct?
Step 6: Create a Ticket with Multiple Fields
Let's get more sophisticated. Here's a ticket with 10 standard fields and custom fields.
Advanced Ticket Creation JSON
{
  "fields": {
    "project": {
      "key": "PROJ"
    },
    "summary": "Complete onboarding for John Smith",
    "description": {
      "type": "doc",
      "version": 1,
      "content": [
        {
          "type": "paragraph",
          "content": [
            {
              "type": "text",
              "text": "New employee starting Monday. Need laptop, accounts, and access."
            }
          ]
        }
      ]
    },
    "issuetype": {
      "name": "Task"
    },
    "priority": {
      "name": "High"
    },
    "assignee": {
      "accountId": "5d53f3cbc6b9320d9ea1c1f9"
    },
    "duedate": "2026-01-15",
    "labels": ["onboarding", "new-hire", "urgent"],
    "components": [
      {
        "name": "IT"
      }
    ],
    "customfield_10047": "Engineering",
    "customfield_10050": {
      "value": "High Priority Client"
    }
  }
}
Let me explain each field:
Standard Fields Explained
Summary (required): Ticket title
"summary": "Your ticket title here"
Description (Jira Cloud format): Uses Atlassian Document Format (ADF)
"description": {
  "type": "doc",
  "version": 1,
  "content": [
    {
      "type": "paragraph",
      "content": [
        {
          "type": "text",
          "text": "Your description text"
        }
      ]
    }
  ]
}
For Jira Data Center/Server, description is simpler:
"description": "Your description text"
Priority: Must match exactly
"priority": {
  "name": "High"
}
Options usually: Highest, High, Medium, Low, Lowest
Assignee: Needs accountId (Cloud) or username (Data Center)
"assignee": {
  "accountId": "5d53f3cbc6b9320d9ea1c1f9"
}
How to find accountId? GET any ticket where that person is assigned, look in the response.
Due Date: ISO format (YYYY-MM-DD)
"duedate": "2026-01-15"
Labels: Array of strings
"labels": ["label1", "label2", "label3"]
Components: Array of objects
"components": [
  {
    "name": "Backend"
  },
  {
    "name": "Frontend"
  }
]
Custom Fields Explained
Text custom field:
"customfield_10047": "Your text value"
Select list custom field:
"customfield_10050": {
  "value": "Option Name"
}
Multi-select custom field:
"customfield_10051": [
  {
    "value": "Option 1"
  },
  {
    "value": "Option 2"
  }
]
Number custom field:
"customfield_10052": 42
Date custom field:
"customfield_10053": "2026-01-15"
User picker custom field:
"customfield_10054": {
  "accountId": "5d53f3cbc6b9320d9ea1c1f9"
}
How to Find Custom Field IDs
Method 1: GET an existing ticket
- Find a ticket that has the custom field populated
- GET that ticket via API
- Search the JSON for the field value
- You'll see the customfield ID
Method 2: Jira Admin
- Settings → Issues → Custom Fields
- Click on the field
- Look in the URL:
...customfield_10047
Method 3: Use the Fields API
GET https://your-domain.atlassian.net/rest/api/3/field
Returns all fields with their IDs and names.
Got a specific automation in mind?
Let's scope it. 30 min on a call usually tells us if it's a Quick Fix, a Sprint, or whether you can build it yourself.
Step 7: Update a Ticket (PUT) - Add a Comment
Let's update an existing ticket by adding a comment.
Create a New PUT Request
- New request in Postman
- Method: PUT
- URL:
https://your-domain.atlassian.net/rest/api/3/issue/PROJ-123/comment
Replace PROJ-123 with your ticket key.
Comment JSON (Jira Cloud)
{
  "body": {
    "type": "doc",
    "version": 1,
    "content": [
      {
        "type": "paragraph",
        "content": [
          {
            "type": "text",
            "text": "This comment was added via API. Testing successful!"
          }
        ]
      }
    ]
  }
}
Comment JSON (Jira Data Center)
{
  "body": "This comment was added via API. Testing successful!"
}
Click Send. Check the ticket in Jira. Your comment appears!
Step 8: Update Fields (PUT)
Let's update multiple fields on an existing ticket.
Update Request
- Method: PUT
- URL:
https://your-domain.atlassian.net/rest/api/3/issue/PROJ-123
Update JSON
{
  "fields": {
    "summary": "Updated summary via API",
    "priority": {
      "name": "Low"
    },
    "duedate": "2026-02-01",
    "labels": ["updated", "via-api"],
    "customfield_10047": "New value"
  }
}
You only include fields you want to change. Fields you don't include stay unchanged.
Click Send. The ticket updates instantly.
Step 9: Transition a Ticket (Change Status)
Changing status is slightly different because it uses workflow transitions.
Find Available Transitions
First, find out which transitions are available:
- Method: GET
- URL:
https://your-domain.atlassian.net/rest/api/3/issue/PROJ-123/transitions
Response:
{
  "transitions": [
    {
      "id": "21",
      "name": "In Progress"
    },
    {
      "id": "31",
      "name": "Done"
    }
  ]
}
Note the transition IDs.
Execute a Transition
- Method: POST
- URL:
https://your-domain.atlassian.net/rest/api/3/issue/PROJ-123/transitions
- Body:
{
  "transition": {
    "id": "31"
  }
}
The ticket status changes. Check it in Jira.
Real-World Examples from Consulting
Let me show you how I actually use this:
Example 1: Testing Automation Rules
Scenario: Client wants automation to populate 12 custom fields based on a dropdown selection.
Without API: Create test ticket, select option, check fields. Repeat 20 times for each option.
With API: Create 20 test tickets in 2 minutes using the API. Verify all at once.
Example 2: Bulk Comment Addition
Scenario: Need to add "Compliance review required" comment to 50 tickets.
Without API: Click each ticket. Add comment. Repeat 50 times. (30 minutes)
With API: Loop through ticket keys with simple script. (2 minutes)
Example 3: Integration Planning
Scenario: Client wants Salesforce to create Jira tickets automatically.
Without API: Explain to developers what's possible. Hope they understand.
With API: Show them the exact JSON structure. Test the integration myself first.
Common Mistakes and How to Fix Them
Mistake #1: JSON Syntax Errors
Problem: Missing comma, extra bracket, wrong quotes
Solution: Use Postman's built-in JSON validator. It highlights errors.
Tip: Copy-paste a working example, then modify it.
Mistake #2: Wrong Custom Field Format
Problem: Using "customfield_10047": "value" when it needs an object
Solution: GET a ticket with that field populated. See the exact format required.
Mistake #3: Expired API Token
Problem: 401 Unauthorized after it was working
Solution: Tokens expire. Generate a new one.
Mistake #4: Wrong Issue Type Name
Problem: Using "User Story" when Jira expects "Story"
Solution: GET the project's issue types:
GET https://your-domain.atlassian.net/rest/api/3/project/PROJ
Check the issueTypes array for exact names.
Mistake #5: Forgetting Authentication
Problem: 401 error on every request
Solution: Check Authorization tab. Is Bearer Token selected? Is token pasted?
Next-Level: Automation with Scripts
Once you're comfortable with Postman, you can automate using scripts.
Python example (using requests library):
import requests
import json

url = "https://your-domain.atlassian.net/rest/api/3/issue"
auth_token = "your-api-token-here"

headers = {
    "Authorization": f"Bearer {auth_token}",
    "Content-Type": "application/json"
}

data = {
    "fields": {
        "project": {"key": "PROJ"},
        "summary": "Automated ticket creation",
        "issuetype": {"name": "Task"}
    }
}

response = requests.post(url, headers=headers, data=json.dumps(data))
print(response.json())
This is beyond the scope of today's tutorial, but knowing the API structure makes scripting straightforward.
Want to skip the trial-and-error?
Book a free strategy call — I'll tell you honestly what I'd build and what I'd avoid.
API Documentation Resources
Official Atlassian API docs:
- Jira Cloud: https://developer.atlassian.com/cloud/jira/platform/rest/v3/
- Jira Server/DC: https://docs.atlassian.com/software/jira/docs/api/REST/latest/
My honest take: Atlassian's API documentation is actually pretty good. It includes examples and explains parameters clearly.
Best way to learn: Combine documentation with GET requests to see real data.
When to Use the API (And When Not To)
Good Use Cases:
✅ Testing configurations
✅ Bulk operations
✅ Integrations with other systems
✅ Automation testing
✅ Data extraction for reporting
✅ Understanding Jira's data structure
Bad Use Cases:
❌ Daily ticket creation (use the UI, it's faster)
❌ Complex workflows (use automation rules)
❌ Ad-hoc updates (UI is easier)
❌ Anything that requires visual feedback
The API is a tool. Use it when it saves time or provides capabilities the UI doesn't offer.
Troubleshooting Checklist
If your API call fails:
- [ ] Is the URL correct? (Check domain, endpoint)
- [ ] Is authentication set up? (Bearer Token in Authorization tab)
- [ ] Is the API token valid and not expired?
- [ ] Is the JSON syntax correct? (Use Postman's validator)
- [ ] Are field names exactly correct? (Case-sensitive)
- [ ] Do you have permission to perform this action?
- [ ] Is the project/issue type valid?
- [ ] Are you using the right API version (v2 vs v3)?
The Bottom Line
The Jira API isn't scary. It's a powerful tool that becomes intuitive with practice.
Start with GET requests. Understand how Jira structures data. Then move to POST and PUT.
Use Postman. It removes 90% of the complexity.
GET existing tickets first. Reverse engineering shows you exact field formats.
AI can help. Tools like ChatGPT can generate JSON for you. Just describe what you want.
This is valuable knowledge, whether you're an admin, consultant, or power user. API literacy opens doors to automation, integration, and deep Jira customization.
Questions about specific API calls? Drop them in the comments. I respond to every one.
Want to see advanced API topics? Let me know:
- Bulk operations with scripts
- JQL via API
- Webhook integrations
- Custom reporting
Questions? Pushback? Something you'd handle differently? Drop it in the comments below — I read and reply to every single one.