JSM Onboarding System with Assets: Automatic Hardware Tracking (Premium)


Yesterday I showed you the complete onboarding system using JSM Standard. Today, we're adding Assets for automatic hardware tracking.
New to Assets? Start with my JSM Assets tutorial.
Same client. Same 1,500-person insurance company. But now we're tracking every laptop, monitor, and phone from assignment to return. Complete lifecycle management.
This is Part 2 of the 3-part onboarding series. If you haven't read Part 1: Complete Onboarding System, start there. I won't re-explain workflows or automation today—that's all covered in Part 1.
Today's focus: Pure Assets integration. How to connect your hardware database to your onboarding form. How to implement basic stock control. How to track equipment throughout the employee lifecycle.
What's Different with Assets
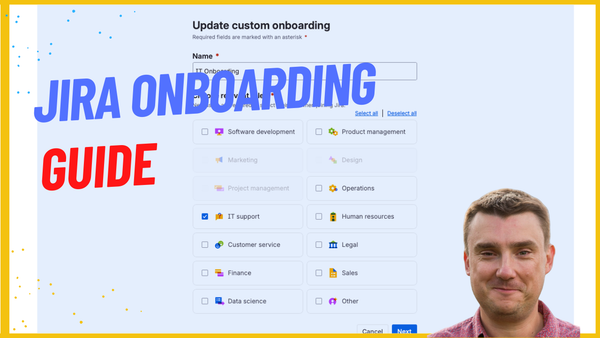
The onboarding form looks almost identical to yesterday's version, but with crucial upgrades:
Software Selection: Now pulls from Assets database, allowing multiple selections
Hardware Selection:
- PC models (Dell Inspiron, HP EliteBook) pulled from Assets
- Mac models (MacBook Air, Pro) pulled from Assets
- Dynamic fields that change based on PC vs Mac selection
- Basic stock control - only shows available equipment
Backend Integration:
- Assets appear on the right side of every ticket
- Full visibility into what's assigned
- Ability to update status directly from ticket
- Complete audit trail
The power: When someone requests a MacBook Pro during onboarding, you're not just noting it in a field. You're assigning a specific asset (serial number, specs, purchase date) and tracking it through its entire lifecycle with that employee.
The Business Case for Assets
JSM Premium costs $57.30/agent/month. Standard is $25. That's a $32.30 difference per agent.
Don't have Premium? See my standard onboarding system.
For 10 agents: $323/month = $3,876/year extra
Is it worth it?
Let me tell you about this 1,500-person company. Before Assets:
- Using 3 separate tools to track equipment
- Still didn't know where half their laptops were
- "Ghost equipment" everywhere
- Compliance nightmares during audits
After implementing Assets:
- £10,000/year savings from tool consolidation
- Zero lost equipment
- Complete audit trail for compliance
- Equipment automatically tracked through employee lifecycle
ROI achieved in under 3 months.
If you're tracking equipment in spreadsheets, using separate asset management tools, or just... not tracking it at all, Premium pays for itself quickly.
Step 1: Set Up Your Assets Database
Before connecting Assets to forms, you need an Assets database. Let's build one quickly.
Access Assets (Premium Only)
- Ensure you have JSM Premium activated (30-60 day free trial available)
- Click Assets in the top navigation
- You'll see the Assets management area
First time here? You'll be prompted to create an object schema.
Choose Your Starting Point
Atlassian gives you three pre-built templates:
- IT Asset Management (recommended for most)
- HR Management
- Facilities Management
My recommendation: Start with IT Asset Management template.
Why?
- Pre-configured object types (Laptops, Phones, Software, etc.)
- Sensible attributes already set up
- Proper relationships configured
- You can customize everything later
To create from template:
- Click Create Object Schema
- Select IT Asset Management
- Name it: "IT Infrastructure" or "Company Assets"
- Click Create
Pro tip: The out-of-the-box IT setup is actually pretty good. I added minor tweaks for clients, but you can use it as-is for most organizations.
What You Get Out-of-the-Box
The IT Asset Management template includes:
Object Types:
- Laptops
- Desktops
- Mobile Devices
- Monitors
- Software Licenses
- Network Equipment
Pre-configured Attributes:
- Serial Number
- Manufacturer
- Model
- Purchase Date
- Warranty Information
- Status
- Owner/Assigned To
This is 90% of what most organizations need.
Add Custom Object Types (Optional)
I added a "Mac" object type separate from "Laptops" for a client who wanted clear differentiation. But honestly, you don't need to do this. You can filter laptops vs Macs using AQL (I'll show you).
Only add custom object types if:
- Your organization has unique equipment categories
- You need very different attributes for different types
- Your workflow demands it
Otherwise, use the defaults.
Critical Addition: Asset Status Field
The one thing I always modify: Asset Status options.
Default statuses are usually:
- Active
- Inactive
I change this to:
- In Stock (available for assignment)
- In Use (assigned to employee)
- In Transit (being shipped)
- In Repair (with IT/vendor)
- Retired (end of life)
Why this matters: Status drives your stock control. When someone requests equipment during onboarding, you only want to show "In Stock" items. Not items already assigned or in repair.
To modify statuses:
- Go to your Assets schema
- Click on "Laptops" object type
- Click Configure > Attributes
- Find "Status" attribute
- Click Edit
- Modify the select list options
- Click Save
Add Some Demo Assets
Before connecting to forms, add 3-5 test assets:
Example: Dell Laptop
- Navigate to "Laptops" object type
- Click Create Object
- Fill in:
- Name: "Dell Inspiron 15 - SN12345"
- Serial Number: "ABC123XYZ"
- Manufacturer: "Dell"
- Model: "Inspiron 15"
- Status: "In Stock"
- RAM: "16GB"
- SSD: "512GB"
- Click Create
Add 2-3 more laptops (mix of Dell, HP, maybe a Mac).
Set some to "In Stock" and one to "In Use" (for testing your AQL filters later).
Step 2: Create the Asset-Enabled Form
Now let's modify your onboarding form to pull from Assets.
If you built the form from Part 1: We're just swapping some fields to Asset fields.
If you're starting fresh: Follow Part 1 first, then come back here.
Convert Hardware Fields to Assets
Original Field: PC Model (Dropdown)
Change to: Assets field
- Go to your onboarding form
- Find the "PC Model" field
- Click the field settings
- Change field type to Assets
- We'll configure the AQL in Step 3
Original Field: Mac Model (Dropdown)
Change to: Assets field (same process)
Original Field: Software (Checkboxes)
Change to: Assets field
Pro tip on software: Allow multiple selections for software. An employee might need Office 365 AND Salesforce AND Slack.
The beauty of Forms: Swapping field types takes literally 1-2 clicks. No rebuilding. No data loss. Just change the type.
Keep Dynamic Fields Working
Your dynamic content still works with Asset fields!
PC selected → Show PC Models (Assets field)
Mac selected → Show Mac Models (Assets field)
The dynamic logic doesn't change. You're just pulling options from Assets instead of static dropdowns.
Step 3: Configure Asset Fields with AQL
This is where the magic happens. AQL (Assets Query Language) filters which assets appear in your form.
Create the Asset Field
- Go to Project Settings > Fields
- Click Create Custom Field
- Select Assets as field type
- Name it: "Mac Models" (or "PC Models", "Software", etc.)
- Click Create
Configure the Field
When you open the field configuration, you'll see several sections. Let's go through the important ones.
Filter Scope
This is your AQL query. It determines which assets appear.
Example: Mac Models
objectType = "Macs" AND objectSchema = "IT Infrastructure"
Breaking this down:
objectType = "Macs"- Only show objects from the Macs typeAND- Both conditions must be trueobjectSchema = "IT Infrastructure"- From this specific schema
Example: PC Models
objectType = "Laptops" AND objectSchema = "IT Infrastructure"
Example: All Computers
objectType IN ("Laptops", "Macs") AND objectSchema = "IT Infrastructure"
Example: Software
objectType = "Software" AND objectSchema = "IT Infrastructure"
Display Attributes
These are the columns users see when selecting an asset.
For laptops/Macs, I show:
- Name
- Asset Tag/Serial Number
- Status
- RAM
- SSD
Why these? They help users (and IT) identify the right equipment. "MacBook Pro - 16GB RAM - 512GB SSD" is clearer than just "MacBook Pro."
To configure:
- In the field configuration, find Display Attributes
- Select which attributes to show
- Order them (most important first)
- Click Save
Pro tip: Don't go crazy. 5-6 attributes maximum. Too many columns overwhelm users.
Multiple Selection
Critical setting: Can users select multiple objects?
For laptops/computers: NO (one laptop per person)
For software: YES (multiple licenses per person)
For monitors: YES (some employees need dual monitors)
To configure:
- Find Field can store multiple objects
- Toggle Yes/No based on need
- Click Save
Step 4: Add Stock Control with AQL
Here's the game-changer: Only show available equipment.
You don't want users selecting laptops already assigned to other employees. You only want to show items with status "In Stock."
The Stock Control AQL
Basic query (shows all Macs):
objectType = "Macs" AND objectSchema = "IT Infrastructure"
With stock control (shows only available Macs):
objectType = "Macs" AND objectSchema = "IT Infrastructure" AND "Asset Status" = "In Stock"
The key addition: AND "Asset Status" = "In Stock"
This filters the list to only show assets marked as available.
How Stock Control Works
Scenario: Onboarding Request
- User requests MacBook Pro
- Form only shows Macs with status "In Stock"
- User selects "MacBook Pro 14 - SN56789"
- Ticket is created with that specific asset linked
- IT prepares the laptop
- IT updates asset status from "In Stock" to "In Use"
- Next onboarding request won't show that MacBook (it's no longer "In Stock")
The result: No double-assigning. No confusion. Complete visibility.
Updating Asset Status
Two ways to update status:
Method 1: From the Ticket
- Open the onboarding ticket
- On the right side, you'll see linked assets
- Click on the asset
- This opens the asset detail page
- Change Status from "In Stock" to "In Use"
- Click Save
Method 2: From Assets
- Navigate to Assets
- Find the asset (search by name or serial number)
- Click to open
- Update Status field
- Click Save
Method 3: Automation (Advanced)
- Create automation rule
- Trigger: When onboarding ticket status = "Complete"
- Action: Update linked asset status to "In Use"
- I'll cover this in a future tutorial
Step 5: Add Asset Fields to Form
Now let's add these configured asset fields to your onboarding form.
- Go to your Employee Onboarding form
- Navigate to the Hardware section
- Click Add Field
- Select your "PC Models" custom field
- Add conditional logic:
- Show when: Computer Type = "PC"
- Click Add
- Add another field
- Select your "Mac Models" custom field
- Add conditional logic:
- Show when: Computer Type = "Mac"
- Click Add
Result: Dynamic asset selection. When users select PC, they see available PCs from Assets. When they select Mac, they see available Macs.
Software Asset Field
- In the Software section of your form
- Click Add Field
- Select your "Software" custom field
- Important: Ensure multiple selections are enabled
- Click Add
Users can now select multiple software licenses: Office 365 + Salesforce + Slack + CRM
Step 6: Test the Complete Flow
Before going live, test everything:
Test Checklist
1. Submit test onboarding request
- Does the form show only "In Stock" assets?
- Can you select a laptop?
- Can you select multiple software?
- Does dynamic switching (PC/Mac) work?
2. Check ticket creation
- Open the created ticket
- Are assets visible on the right side?
- Can you click through to asset details?
3. Test status updates
- Change asset status from "In Stock" to "In Use"
- Submit another test request
- The previously selected asset should NOT appear
4. Verify asset linking
- Go to Assets
- Find the asset you assigned in the test
- Does it show the linked ticket?
- This creates your audit trail
If everything works: You're ready to go live.
If something's broken:
- Double-check your AQL syntax
- Verify object type names match exactly (case-sensitive)
- Ensure assets have correct status values
The Complete Workflow in Action
Let's walk through a real onboarding with Assets:
Day 1: Request Submitted
- Manager submits onboarding request for new employee
- Selects "MacBook Pro 14" from available options
- Selects Office 365, Salesforce, Slack licenses
- Ticket created: Issue #123
Day 2: IT Preparation
- IT agent views ticket
- Sees specific MacBook assigned: "MBP14-SN789 - 16GB - 512GB"
- Retrieves laptop from storage
- Installs software licenses (all listed in ticket)
- Updates asset status: "In Stock" → "In Use"
Day 3: Employee Start Date
- Laptop delivered to employee
- All software pre-installed
- Asset record shows:
- Assigned to: John Smith
- Assignment date: [Today]
- Linked ticket: Issue #123
- Status: In Use
Ongoing: Complete Lifecycle Tracking
- If laptop needs repair: Update status to "In Repair"
- If employee reports issue: New ticket auto-links to asset
- If employee leaves: Offboarding ticket links to same asset
- Full history visible in asset record
This is lifecycle management. From assignment to return, every interaction is tracked.
Advanced: AQL Query Examples
Once you're comfortable with basics, here are more powerful queries:
Filter by Manufacturer
objectType = "Laptops" AND Manufacturer = "Dell" AND "Asset Status" = "In Stock"
Shows only available Dell laptops.
Filter by Specifications
objectType = "Laptops" AND RAM >= "16GB" AND "Asset Status" = "In Stock"
Shows only laptops with 16GB+ RAM (for power users).
Filter by Purchase Date
objectType = "Laptops" AND "Purchase Date" >= "2023-01-01" AND "Asset Status" = "In Stock"
Shows only laptops purchased after 2023 (newer equipment).
Exclude Specific Items
objectType = "Laptops" AND Manufacturer != "HP" AND "Asset Status" = "In Stock"
Shows all laptops except HP.
Multiple Statuses
objectType = "Laptops" AND "Asset Status" IN ("In Stock", "In Transit")
Shows laptops that are available or being shipped.
Pro tip: Start simple. Add complexity only when you have a specific need.
Common AQL Mistakes (And How to Fix Them)
Mistake #1: Case Sensitivity
❌ objecttype = "laptops"
✅ objectType = "Laptops"
AQL is case-sensitive. Match your object type names exactly.
Mistake #2: Wrong Quote Types
❌ objectType = "Laptops"
✅ objectType = "Laptops"
Use straight quotes, not curly quotes (Word loves adding curly quotes—watch out).
Mistake #3: Missing Schema Reference
❌ objectType = "Laptops" AND "Asset Status" = "In Stock"
✅ objectType = "Laptops" AND objectSchema = "IT Infrastructure" AND "Asset Status" = "In Stock"
Always include schema reference if you have multiple schemas.
Mistake #4: Attribute Name Spaces
If your attribute has spaces, wrap it in quotes:
❌ Asset Status = "In Stock"
✅ "Asset Status" = "In Stock"
Mistake #5: Testing with Wrong Data
Problem: Your AQL looks correct but shows no results.
Solution: Check your actual asset data. Maybe all laptops are marked "In Use" and none are "In Stock." Create a test asset with correct status.
Reporting on Assets
With Assets integrated, you can now answer questions like:
Asset Reports:
- How many laptops are currently assigned?
- Which assets are available for new hires?
- What equipment needs replacement (old purchase dates)?
- Who has what equipment?
Onboarding Reports:
- Average time from request to equipment assignment
- Most commonly requested equipment
- Stock availability issues (ran out of Macs?)
To access reports:
- Go to Assets > Reports
- Create custom reports based on object types
- Filter by status, assignment, dates, etc.
Honest take: Assets reporting is still basic. For complex analytics, I usually export to CSV and analyze in Excel. But for quick visibility, built-in reports work fine.
Maintenance: Keeping Assets Updated
Assets are only valuable if data is accurate.
Weekly Tasks
- [ ] Review "In Transit" assets (anything stuck?)
- [ ] Check for assets marked "In Use" with no linked tickets (orphaned?)
- [ ] Verify new equipment was added to Assets
Monthly Tasks
- [ ] Audit asset status (do statuses match reality?)
- [ ] Review warranty expiration dates
- [ ] Check for equipment due for replacement
Quarterly Tasks
- [ ] Full asset count (physical verification)
- [ ] Remove retired equipment from database
- [ ] Update asset values (for financial reporting)
Assign ownership: Someone needs to be responsible for asset data quality. Usually IT Manager or Asset Coordinator.
What's Coming: Advanced Topics
This tutorial covers the foundation. In future articles, I'll show you:
CSV Import: Bulk load 500+ assets in minutes (coming this week)
Python Scripts for API: Automate asset creation and updates programmatically
Full Stock Control: Track quantity, not just status. Alert when running low.
Automated Status Updates: When ticket status changes, update asset status automatically
Offboarding Integration: Tomorrow's tutorial - how to track equipment return during employee exit
The Reality Check
Assets isn't perfect. Here's what I wish was better:
❌ No native quantity tracking - You need workarounds or custom fields
❌ Reporting is basic - Not enterprise BI level
❌ No automatic depreciation - Financial tracking requires manual updates
❌ AWS/Azure integration limited - Can't auto-discover cloud resources (yet)
But here's what Assets does really well:
✅ Tight JSM integration - Assets linked to tickets seamlessly
✅ Simple for teams to use - Not overwhelming like enterprise CMDB tools
✅ Fast to implement - Running in days, not months
✅ Flexible - AQL gives you powerful filtering
✅ Audit trail - Complete history of asset lifecycle
For most organizations: Assets is more than enough. You don't need a $100K enterprise CMDB. You need visibility and control. Assets delivers that.
Assets vs Alternatives
Should I use JSM Assets?
Use JSM Assets if:
- You're already using JSM for service desk
- You need tight integration with service requests
- Your team is < 5,000 employees
- You want fast implementation
- Budget is moderate
Consider alternatives if:
- You need advanced financial asset management (depreciation, etc.)
- You're managing 10,000+ assets across multiple locations
- You need AWS/Azure cloud resource discovery
- You have complex compliance requirements (heavy industry, gov)
- You already have a mature CMDB you're happy with
My take after 14+ years: For 90% of organizations, JSM Assets is the sweet spot of functionality, cost, and implementation speed.
Next Steps
You now have onboarding with automatic hardware tracking. Here's what to do:
This Week:
- Activate Premium trial (if not already)
- Create Assets schema using IT template
- Add 10-20 demo assets
- Configure asset fields with AQL
- Add fields to onboarding form
- Test complete flow
Next Week:
7. Import bulk assets via CSV (tutorial coming)
8. Train team on asset status updates
9. Go live with asset-enabled onboarding
Tomorrow:
10. Read Part 3: Complete offboarding system
11. Learn how to track equipment return
12. Build the full employee lifecycle
The Bottom Line
This system works.
The 1,500-person insurance company isn't hypothetical. It's real. Three weeks to three days is real. £10,000/year savings is real.
Assets integration transforms onboarding from:
- "Order a laptop for the new person"
- Into: "Assign MacBook Pro SN789 to John Smith, track through entire tenure, recover during offboarding"
That's the difference between chaos and control.
If you want this running in your environment this week—complete object schemas, AQL filters, form integration, production-ready—book a consultation.
I build these systems in 3-5 days. You'll spend 2-3 weeks figuring out AQL syntax and debugging queries. Let me handle it.
Tomorrow: Complete Offboarding System - Equipment recovery, access revocation, exit interviews. The system that ensures nothing disappears when employees leave.
This Week: CSV Import & Python Scripts - Bulk load hundreds of assets. Automate updates programmatically.
Subscribe so you don't miss these.
Questions about Assets or AQL? Drop them in the comments. I respond to every one.