JSM Forms: Why I Use Them 95% of the Time (And You Should Too)

Controversial statement: If you're not using Forms in JSM, you're wasting time and making life harder than it needs to be.
New to JSM? Start with What is JSM.
After 14+ years consulting, I use Forms in approximately 95% of JSM implementations. Not traditional request types—Forms.
Why? Let me tell you what happened last month.
Client scenario: 500-1,000 internal users. JSM for IT support. They'd spent weeks tweaking traditional request types. Users ignored them. Complaints everywhere. Tickets were messy.
Me: "Are you using Forms?"
Client: "No, we thought that was just a gimmick."
I showed them Forms. Two days later, user satisfaction jumped. Ticket quality improved. Support team stopped complaining.
That's the power of Forms.
Let me show you why Forms should be your default choice, not your backup plan.
The #1 Reason to Use Forms: Speed and Flexibility
Here's the painful truth about traditional JSM request types:
When you configure a request type and realize you made a mistake, fixing it is a nightmare.
Example scenario:
- You create a field: "Department" (dropdown, single select)
- Users complain: "We need to select multiple departments!"
- You need to change it to multi-select
With traditional custom fields:
Forms populate custom fields - plan them together.
- You CANNOT change field type
- You must create a NEW field
- Now you have two "Department" fields
- You can't delete the old one (loses historical data)
- You rename it "Department_OLD" or something
- Update all request types to use new field
- Train users on the change
- Deal with confusion for weeks
Total time: Hours to days of work
With Forms:
- Click on the field
- Change type from "Dropdown" to "Checkboxes"
- Click Save
Total time: 5 seconds
This alone justifies using Forms.
My Top 8 Reasons to Use JSM Forms
After hundreds of implementations, here's why I recommend Forms 95% of the time.
Reason #1: One-Click Field Type Changes
I already mentioned this, but it's so important I'll say it again.
Fields you can instantly change:
- Short text ↔ Long text
- Dropdown ↔ Radio buttons ↔ Checkboxes
- Single select ↔ Multi-select
- Date ↔ Date & Time
No custom field creation. No historical data loss. No confusion.
Real example: Client changed their mind 3 times about how to collect priority information. With Forms, I made the changes during the phone call. With custom fields, that would have been weeks of rework.
Reason #2: Dynamic/Conditional Fields (The Game-Changer)
This is THE killer feature. Forms are the ONLY way to create conditional logic without plugins.
What are conditional fields?
Show/hide fields based on user selections.
Example: IT Support Request
Instead of 4 separate request types:
- Printer Issue
- VPN Problem
- Email Issue
- Hardware Request
Create ONE dynamic form:
Issue Type: [Dropdown]
- Printer
- VPN
- Email
- Hardware

[IF Printer selected]
→ Show: Printer Type [Dropdown: Inkjet, Laser]
→ Show: Printer Model [Text]
→ Show: Error Message [Long Text]

[IF VPN selected]
→ Show: Connection Type [Dropdown: Remote, Office]
→ Show: Error Details [Long Text]

[IF Hardware selected]
→ Show: Equipment Type [Dropdown: Laptop, Monitor, Phone]
→ Show: Urgent? [Yes/No]
The result: Form adapts on-the-fly. Users only see relevant fields. No confusion. Clean data.
Without Forms? You'd need:
- 4 separate request types OR
- One massive form with every possible field OR
- Expensive marketplace apps
Limitation: Forms support up to 2 levels of conditional logic. Usually enough for 90% of cases.
Reason #3: Clone/Copy Forms Across Request Types
Real scenario: Client needed 50 different request types for different departments.
Using Forms: 2 days
Using traditional custom fields: 2-3 weeks
Why?
Forms can be copied:
- Create "Master Request Form" with common fields
- Click Copy Form
- Rename: "HR Request", "Finance Request", etc.
- Tweak department-specific fields
- Link to request types
- Done
Each copy takes 2-3 minutes instead of 30+ minutes building from scratch.
Reason #4: Rich Content Support (Images, Videos, Instructions)
Forms support rich media. Traditional request types don't (or barely).
What you can add:
- Headings and sections (organize the form visually)
- Instructional text (explain what each field needs)
- Images (diagrams, examples, screenshots) - limited, check current Atlassian policy
- Videos (Loom, YouTube, Vimeo embeds)
Real use case:
Client had a complex procurement request form. Users kept filling it out wrong.
Solution:
- Embedded 60-second Loom video at the top of the form
- "Watch this quick guide on how to fill this out correctly"
- Mistakes dropped by 70%
With traditional request types: You'd put video links in the description. Nobody clicks them.
With Forms: Video plays right in the form. People watch it.
Reason #5: Live Preview
When building Forms:
- Click Preview button
- See exactly what users will see
- Test conditional logic
- Verify field order
- Check mobile view
When building traditional request types:
- Configure fields blindly
- Publish to portal
- Open portal in incognito window
- Test
- Find problems
- Go back to admin
- Fix
- Repeat
Forms save hours of testing.
Reason #6: Better Field Validation
Forms have advanced validation that custom fields don't.
Examples:
Text fields:
- Minimum/maximum characters
- Minimum/maximum words
- Regex patterns
Prevent users submitting:
- Single-word descriptions ("Help!")
- Excessive text (5,000-word rants)
- Improperly formatted data
Real example:
Client complained: "Users just type a dot (.) in Description and submit."
Solution:
- Set minimum: 10 words in Description field
- Users forced to provide actual details
- Ticket quality improved dramatically
Custom fields can't do this without marketplace apps.
Reason #7: Multiple Layout Options
Forms support different visual layouts:
Classic (my preference):
- Traditional waterfall layout
- One question per row
- Familiar, easy to scan
Split Screen:
- Questions on left, answers on right
- More compact
- Good for shorter forms
Three Column:
- Questions span full width
- Answer fields in 3 columns
- Best for very short answer fields
Why this matters: Different forms need different layouts. Equipment requests work better split-screen. Incident reports work better classic.
With traditional request types: You get one layout. Deal with it.
Reason #8: Embedded in Portal and Ticket View
User perspective:
- Submits form through portal
- Can view submitted form in their request
- Can edit form if allowed
- Can download form as PDF
Agent perspective:
- Form embedded in ticket (right side panel)
- All answers visible at a glance
- Can re-open form to edit
- Can download as PDF or XLS (Excel)
Why this matters: All information in one place. No clicking through custom fields tabs.
How to Create Your First Form
Let me walk you through the exact process.
Step 1: Navigate to Forms
- Open your JSM project
- Project Settings (bottom left)
- Click Forms (in the left sidebar)
You'll see a list of forms (empty if this is your first).
Step 2: Create or Choose Template
Option A: Blank Form (my recommendation)
- Click Create Form
- Select Blank Form
- Name it: "IT Support Request"
- Click Create
Option B: Use Template
Atlassian provides 200+ templates:
- IT support
- HR onboarding
- Purchase requests
- Incident reports
- Change requests
- And many more
See Forms in action in my Employee Onboarding System.
My take on templates:
They're okay. Some are decent starting points. But I usually start blank because:
- Templates have fields I don't need
- Removing fields is annoying
- Starting fresh is often faster
- I understand the form better if I built it
But: If you're new to Forms, try a template. See how it's structured. Then create your own.
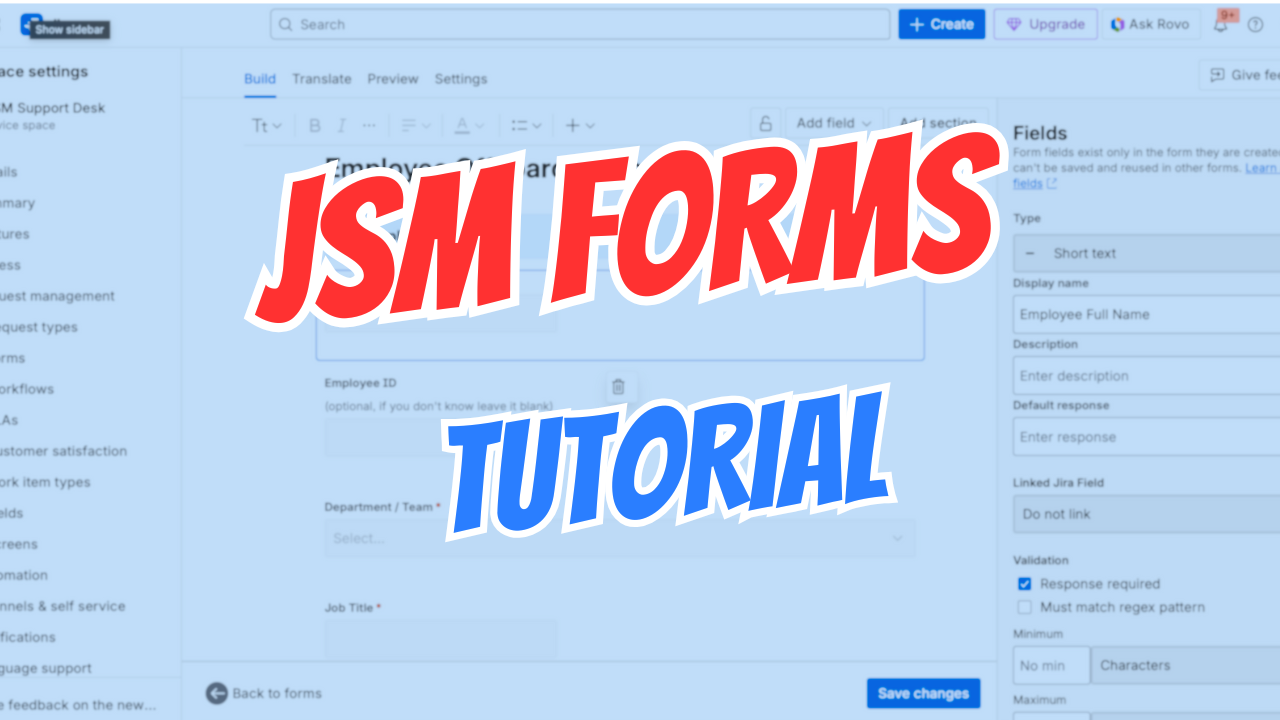
Step 3: Add Fields
Click Add Field and choose field type:
Text Fields:
- Short Text - One-line answer (name, email, ID)
- Paragraph - Multi-line text (descriptions, details)
- URL - Website links
Selection Fields:
- Dropdown - Select one from list
- Checkboxes - Select multiple from list
- Radio Buttons - Select one (visually different than dropdown)
Date & Time:
- Date - Calendar picker
- Date & Time - Calendar + time picker
Files:
- File Upload - Attach documents, images, etc.
Advanced:
- People - User picker
- Assets - Link to JSM Assets (Premium only)
Step 4: Configure Each Field
Click on a field to configure:
Basic Settings:
- Label - Question text (e.g., "What's the issue?")
- Helper Text - Additional guidance (appears below field)
- Required - Toggle on/off
- Default Value - Pre-fill if applicable
Validation (for text fields):
- Minimum characters
- Maximum characters
- Minimum words
- Maximum words
For Selection Fields:
- Add options (one per line)
- Set default selection
Step 5: Add Conditional Logic
To make a field conditional:
- Click on the field you want to show/hide
- Look for Show this field when...
- Click Add condition
- Choose:
- Which field triggers it
- What value triggers it
- Click Save
Example:
Field: "Printer Model"
Show when: "Issue Type" = "Printer"
Now "Printer Model" only appears when user selects "Printer" as issue type.
Step 6: Organize with Sections
Sections create visual breaks and organize long forms.
- Click Add Section
- Name it: "User Information"
- Drag fields into section
- Collapse/expand sections during editing
Example form structure:
Section 1: User Information
- Name
- Department
Section 2: Issue Details
- Issue Type (dropdown with conditional fields)
- Description
- Attachment
Section 3: Additional Info
- Priority
- Due Date (if applicable)
Step 7: Preview and Test
- Click Preview button (top right)
- Fill out the form as a user would
- Test conditional logic
- Check field order and layout
- Verify required fields work
Make adjustments. Preview again. Repeat until perfect.
Step 8: Link to Request Type
Now connect your form to a request type.
Option A: New Request Type
- Project Settings > Request Types
- Click Create Request Type
- Name it: "IT Support"
- In the Form section, click Select existing
- Choose your form
- Click Save
Option B: Existing Request Type
- Project Settings > Request Types
- Click on existing request type
- Scroll to Form section
- Click Change Form or Select existing
- Choose your form
- Click Save
Important: You typically want to hide the Summary field when using Forms. The form itself provides context.
To hide Summary:
- In Request Type settings
- Find Fields section
- Click Configure
- Find "Summary" field
- Click Hide
Step 9: Test in Portal
- Open your portal (as a user would)
- Select your request type
- Fill out the form
- Submit
Check:
- Does conditional logic work?
- Are required fields enforced?
- Is the layout clear?
- Does it create the ticket correctly?
If something's wrong: Go back to Forms editor, fix, test again.
Real-World Form Examples
Let me show you actual forms I've built for clients.
Example 1: IT Support Request (Dynamic)
Goal: Replace 5 separate request types with one smart form.
Form Structure:
Issue Category (Dropdown, required)
- Hardware
- Software
- Network
- Access
- Other
[IF Hardware]
- Equipment Type: Laptop / Desktop / Monitor / Phone / Other
- Problem Description (paragraph, min 20 words)
- Urgent? Yes/No
[IF Software]
- Application Name (dropdown of common apps)
- Error Message (paragraph)
- Screenshot (file upload)
[IF Network]
- Connection Type: WiFi / Ethernet / VPN
- Location: Office / Remote
- Error Details (paragraph)
[IF Access]
- System Name (dropdown)
- Access Level Needed (dropdown)
- Business Justification (paragraph, min 30 words)
[IF Other]
- Please Describe (paragraph, min 30 words)
Result: One form, hundreds of combinations. Clean data. Happy users.
Example 2: Employee Onboarding (Multi-Section)
Section 1: New Employee Details
- Full Name (short text, required)
- Personal Email (short text, required)
- Start Date (date, required)
- Department (dropdown, required)
- Job Title (short text, required)
- Manager (people picker, required)
Section 2: Equipment Needed
- Computer Type: PC / Mac / None
- [IF PC] PC Model (dropdown)
- [IF Mac] Mac Model (dropdown)
- Monitor Needed? Yes/No
- Phone Needed? Yes/No
- Other Equipment (paragraph, optional)
Section 3: System Access
- Email Account (checkbox, default checked)
- Software (checkboxes, multiple selection)
- Office 365
- Salesforce
- Slack
- HR System
- Other (specify)
Section 4: Additional Info
- Special Requirements (paragraph, optional)
- Notes for IT (paragraph, optional)
This form took 15 minutes to build. Handles hundreds of onboarding requests monthly.
Example 3: Purchase Request (with Approvals)
Section 1: Requester Information
- Name (auto-filled from user)
- Department (dropdown)
- Budget Code (short text)
Section 2: Purchase Details
- Item Description (short text, required)
- Quantity (number, required)
- Unit Price (number, required)
- Total Cost (calculated - would need automation)
- Vendor/Supplier (short text)
- Link to Product (URL)
Section 3: Justification
- Business Need (paragraph, min 50 words, required)
- Preferred Delivery Date (date)
Section 4: Approvals
(Handled by workflow, not form fields)
This form feeds into approval workflows. Manager approves → Finance approves → Procurement executes.
The One Caveat: Linked Fields
There's one limitation with Forms that you need to know about.
The Problem: No JQL Access (By Default)
Forms data is stored separately from custom fields.
What this means:
If you create a form with a "Department" dropdown, you CANNOT use JQL to filter by department.
Example that won't work:
Department = "Engineering" ❌ (if Department is a form-only field)
Why? JQL queries custom fields. Forms (by default) don't create linked custom fields.
The Solution: Link Form Fields to Custom Fields
You can link form fields to actual custom fields.
To link a field:
- Edit your form
- Click on a field (e.g., "Department")
- Look for Link to existing field
- Select the corresponding custom field
- Click Save
Now JQL works:
Department = "Engineering" ✅
The Trade-Off
Linking fields gives you:
✅ JQL filtering
✅ Reporting capabilities
✅ Dashboard integration
But you lose:
❌ One-click field type changes (can't change dropdown to text if linked)
❌ Some flexibility
My Recommendation
Link fields if:
- You need to report on that field
- You'll filter by that field often
- The field type is unlikely to change
Don't link fields if:
- You're still figuring out the form
- The field might change type
- You don't need to query it
Common fields I link:
- Priority
- Category/Type
- Department
- Status (if custom)
Common fields I don't link:
- Free-text descriptions
- Names, emails (rarely filtered)
- Attachments
- Instructional sections
Common Mistakes (And How to Avoid Them)
Mistake #1: Too Many Conditional Levels
Problem: Trying to nest 3-4 levels of conditionals.
Why it fails: Forms support max 2 levels. Gets confusing fast.
Solution: Keep conditionals simple. If you need deep nesting, consider separate forms.
Mistake #2: Making Everything Required
Problem: Marking 20 fields as required.
Why it fails: Users abandon forms. Too much friction.
Solution:
- Required: Name, Contact, Issue Description
- Optional: Everything else
Let users submit quickly. You can ask follow-up questions in comments if needed.
Mistake #3: Not Using Sections
Problem: 15 fields in one long list.
Why it fails: Overwhelming. Users lose track.
Solution: Group into logical sections. Max 5-7 fields per section.
Mistake #4: Ignoring Helper Text
Problem: Field labels like "Details" with no explanation.
Why it fails: Users don't know what to write.
Solution: Add helper text:
- Label: "Issue Details"
- Helper Text: "Describe what's happening, what you expected, and any error messages you see"
Mistake #5: Not Testing Mobile View
Problem: Form looks great on desktop, terrible on mobile.
Why it fails: 40%+ of users access portal on mobile.
Solution: Preview on mobile (or use browser dev tools). Adjust layout if needed.
Forms vs Traditional Request Types: Decision Matrix
When to use Forms (95% of cases):
✅ Any new request type you're creating
✅ Need conditional logic
✅ Want flexibility to change field types
✅ Rich content needed (videos, images, sections)
✅ Combining multiple request types into one
✅ User experience matters
When to use Traditional Custom Fields (5% of cases):
❌ Very complex, enterprise-wide field schemes already in place
❌ Heavy JQL reporting requirements across 50+ projects
❌ Legacy system that's working fine (don't fix what isn't broken)
❌ Integration requirements that specifically need custom fields
Default to Forms. Use custom fields only when you have a specific reason.
The Bottom Line
Forms are not a "nice to have" feature. They're the superior way to collect information in JSM.
After 14+ years consulting:
- I use Forms in 95% of implementations
- I've converted dozens of clients from custom fields to Forms
- User satisfaction improves every time
- Support teams waste less time on bad data
- Admin overhead drops dramatically
The client I mentioned at the start? After switching to Forms:
- Ticket quality improved 60%
- User complaints dropped 70%
- Form edits that took days now take seconds
Start using Forms today.
Want help building Forms for your JSM instance? I offer 30-minute to 6-hour consultations specifically on JSM form design and implementation. Book a discovery call and I'll show you exactly how to structure forms for your use cases.
New JSM Forms Training: I just released a complete JSM course that includes a dedicated module on Forms with 10+ real-world examples you can copy. Check it out.
Questions about Forms? Drop them in the community. I respond to every one.