
Jira Workflow Customization Guide 2026: Stop Overcomplicating Everything


I recently inherited a client's Jira instance with 25 statuses in their workflow.
Twenty-five.
When I presented the workflow diagram to the stakeholders, they shrugged. The managers said "it seems detailed." But the people actually doing the work? They told me it was a nightmare.
"I never know which status to pick." "The transitions don't make sense - why can't I go from here to there?" "I spend more time thinking about Jira than doing my actual work."
Sound familiar?
Workflow overcomplication is one of the most common problems I see. And here's the thing I've learned after 14 years of consulting:
I've never been called to rescue a team that kept things too simple.
This guide covers everything you need to know about Jira workflows in 2026: the philosophy of simplicity, the simplified vs classic transitions debate, how to use multiple workflows per project (something many teams don't even know is possible), and a practical walkthrough of building workflows the right way.
Let's fix your workflows.
The Philosophy: Why Simple Wins
Let me be direct: 80% of teams I work with are over-engineered, not under-engineered.
They have workflows that look impressive on a diagram but cause daily friction for the people using them. Every unnecessary status is a decision point. Every complex transition is a moment of confusion.
The "What's Happening" Test
Every status in your workflow should answer one simple question: "What is this work doing RIGHT NOW?"
- Good: "In Code Review" - I know exactly what's happening
- Bad: "Pending Review Level 2" - What does that even mean?
- Good: "Waiting for Customer" - Clear blocker
- Bad: "Status 4" - Nobody knows what this is
If your team has to think about which status to pick, your workflow is fighting them.
The 2-Minute Rule
Here's my test: Can you explain your workflow to a new team member in 2 minutes or less?
If you need a flowchart, documentation, and a training session to explain your workflow, it's too complex.
My Mantra
"Transitions are for computers, not humans."
Humans should focus on their work. If they're thinking about which button to click, which transition to use, or why they can't move from one status to another - you've failed.
The best workflow is invisible. People use it without thinking about it.
The Secret: Multiple Workflows Per Project
Here's something that surprises me every time: many teams don't know you can have different workflows for different issue types in the same project.
This is company-managed projects, by the way - team-managed is different.
The Problem
Most teams create a project and use the same workflow for everything:
- Stories
- Tasks
- Bugs
- Epics
- Subtasks
All the same workflow. All the same statuses. All the same transitions.
This is a mistake.
Why Different Issue Types Need Different Workflows
Think about it:
Bugs need a simple, fast workflow. Something goes wrong, someone fixes it, done.
- Open → In Progress → Done
- Maybe add "Blocked" if you need it
- That's it. 4 statuses maximum.
Epics need an even simpler workflow. The epic itself doesn't "do" anything - the child issues do the work.
- Open → Done
- Two statuses. That's all.
- Everything in the middle is tracked by the stories and tasks inside it.
Stories might need a bit more:
- To Do → In Progress → In Review → Done
- Still only 4 statuses, but with a review step.
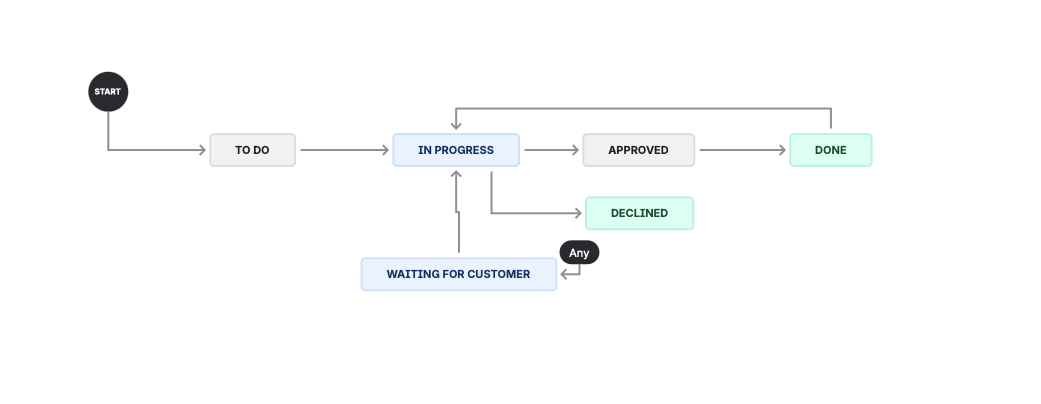
Service requests (if using JSM) might need approvals:
- Open → Waiting for Approval → Approved/Declined → In Progress → Done
How to Set This Up
In your project settings:
- Go to Workflows
- Click Add Workflow
- Select which issue types use which workflow
You can have:
- "Bug Workflow" → Applied to Bugs only
- "Epic Workflow" → Applied to Epics only
- "Standard Workflow" → Applied to Stories, Tasks
Each workflow is independent. Each can be as simple or complex as that issue type actually needs.
The Key Insight
Match workflow complexity to issue type needs.
Don't force a 12-status workflow on bugs because your stories need 12 statuses. Give bugs their own simple workflow.
This alone can dramatically reduce daily friction.
The Great Debate: Simplified vs Classic Transitions
This is the argument I have with teams constantly. Let me break it down.
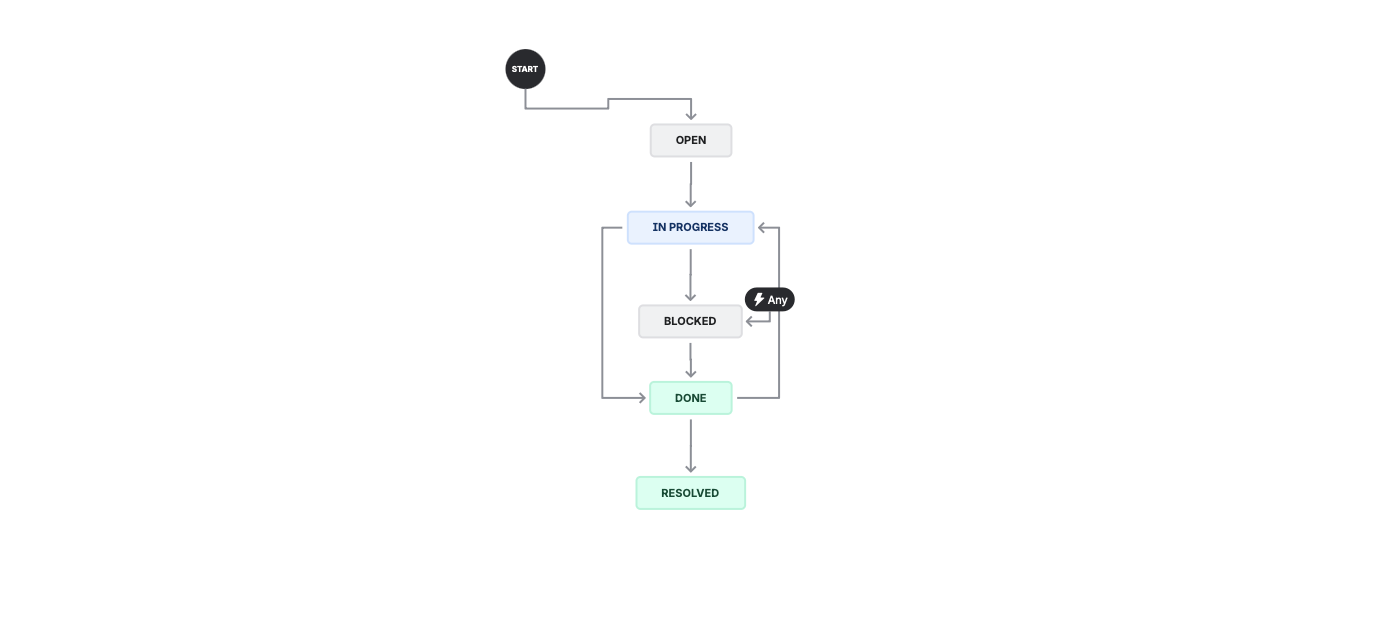
Simplified Workflow (Any-to-Any)
In a simplified workflow, any status can transition to any other status.
Open ←→ In Progress ←→ Done
  ↑________↑__________↑
  (all connected to all)
Pros:
- Maximum flexibility
- No frustrating "I can't move this issue" moments
- Relies on team discipline rather than system enforcement
- Low maintenance
- Fast to set up
Cons:
- No guardrails - people can skip steps
- Harder to enforce process compliance
- Can get messy if team isn't disciplined
- Automation triggers less predictable
Best for:
- Small teams
- High-trust environments
- Simple processes
- Teams that hate friction
Classic Workflow (Defined Transitions)
In a classic workflow, each transition is explicitly defined.
Open → In Progress → In Review → Done
         ↓              ↓
      Blocked      Needs Work
Pros:
- Process enforcement - people must follow the defined path
- Better for compliance and audit trails
- Automation triggers are predictable
- Can add validators, conditions, approvals
Cons:
- Rigid - users get frustrated when they can't move issues
- Higher maintenance
- More complex to set up and modify
- Users work around the system when it's too restrictive
Best for:
- Regulated industries
- Large teams with less trust
- Complex processes with required steps
- Environments needing audit trails
My Recommendation: Start Simplified
Here's my stance: Start with simplified workflows. Add defined transitions only when you have EVIDENCE of problems.
Most teams jump to classic workflows because they think they need control. But that control comes at a cost: friction, frustration, and workarounds.
Start simple. If you see problems - people skipping important steps, process breakdowns, compliance issues - THEN add specific transitions to fix those specific problems.
Don't pre-engineer complexity based on hypothetical problems.
The Real-World Truth
I charge clients to REMOVE complexity more often than to add it.
The 25-status client? We trimmed it to 7 statuses. Their velocity increased. Their Jira complaints decreased. Nobody missed the 18 statuses we removed.
Status Design Principles
Start Minimal
The baseline workflow is:
- To Do → In Progress → Done
That's it. Three statuses. Start here.
Add statuses only when you have REAL problems that require more granularity. Not theoretical problems. Real ones.
Status Categories Matter
Every status belongs to a category:
- To Do (gray) - Work not started
- In Progress (blue) - Work actively happening
- Done (green) - Work completed
These categories drive:
- Board column colors
- Velocity reports
- Cumulative flow diagrams
- Control charts
Workflows and boards go hand-in-hand. See my Kanban Pro Setup guide for board best practices.
If you miscategorize your statuses, your reports are wrong.
I've seen teams with "Waiting for Customer" categorized as "In Progress" - which means their cycle time reports include time the team wasn't actually working. Garbage data.
Naming Conventions
Be specific but concise:
- "In Review" not "Review"
- "Waiting for Customer" not "Waiting"
- "In Development" not "Dev"
Use active language:
- "In Progress" not "Started"
- "In Code Review" not "Code Review Queue"
Avoid jargon:
- "Ready for QA" is clear
- "Ready for UAT Phase 2 Validation" is not
The New Workflow Editor (2024/2025)
Atlassian updated the workflow editor with a visual drag-and-drop interface. It's... fine.
What's Better
- Visual diagram view makes workflows easier to understand
- Drag-and-drop status creation
- Easier to see the full workflow at a glance
- Improved rule creation interface
What's Still Awkward
- JSM approval setup is still clunky (in my opinion)
- Some advanced configurations require more clicks than the old editor
- The transition from old workflows to new editor can be confusing
My Take
The new editor is good for building new workflows. It's more visual and intuitive for most operations. But I still find certain advanced configurations (especially JSM approvals) slower than they need to be.
You'll get used to it. The visual interface is ultimately better for understanding what you've built.
Technical Walkthrough: Building a Workflow
Let's get practical. Here's exactly how to create and apply a workflow.
Finding Your Workflows
Method 1: Project Level
- Go to your project
- Click Project Settings (bottom left)
- Click Workflows
- See all workflows applied to this project
This is the fastest way to find workflows for a specific project.
Method 2: Global Level
- Click the gear icon (Settings)
- Click Issues
- Click Workflows in the left sidebar
- See ALL workflows across your entire Jira instance
Use this when you need to manage workflows across multiple projects.
Creating a New Workflow
- Go to Settings → Issues → Workflows
- Click Add workflow → Create new
- Give it a clear name (e.g., "Bug Workflow - Simple")
- Click Create
You'll see a blank workflow with just an "Open" status.
Adding Statuses
- Click Add status
- Search for an existing status OR create a new one
- Choose whether to allow all statuses to transition to this one (simplified) or define specific transitions (classic)
- Repeat for each status you need
Pro tip: Start with "Allow all statuses to transition" for flexibility. You can always restrict later.
Example: Building a Simple Bug Workflow
- Create workflow named "Bug Workflow"
- Add status "In Progress" - allow all transitions
- Add status "Done" - allow all transitions
- Make sure "Open" also allows all transitions
Result: A 3-status workflow where bugs can move freely between Open, In Progress, and Done.
Applying a Workflow to a Project
- Copy your workflow name (you'll need it)
- Go to your project → Project Settings → Workflows
- Click Add Workflow
- Choose Add existing
- Search for your workflow name (use Ctrl+F/Cmd+F to find it quickly)
- Select which issue types should use this workflow
- Click Finish
Important: The workflow is now applied but not published.
Publishing Changes
When you publish, Jira will ask you to migrate existing issues:
- If you removed statuses, you'll need to map old statuses to new ones
- If you renamed statuses, you'll need to confirm the mapping
Click Publish and then Associate to finalize.
Caution: Changing workflows on existing projects can break things. Always test on a smaller scale first if possible.
Copying Workflows (Version Control)
Before making major changes to a live workflow:
- Go to the workflow in the global list
- Click the ... menu
- Click Copy
- Rename to "Workflow Name 2.0" (remove "Copy of")
- Make your changes on the copy
- Apply the new version to your project
- Keep the old version as a backup
This gives you a rollback option if something breaks.
Advanced Features: Validators, Conditions, and Approvals
These features are powerful but use them sparingly. Every rule you add is complexity that can confuse users.
Validators
Validators require something to be true BEFORE a transition can happen. If the validation fails, the user sees an error.
Common validators:
Field Required Validator
- Requires a field to have a value before transitioning
- Example: Require "Assignee" before moving to "In Progress"
- Error message: "Please enter a value for Assignee"
Parent Status Validator
- Requires the parent issue to be in a certain status
- Example: Child tasks can't be "Done" until the parent Story is "In Progress"
Previous Status Validator
- Requires the issue to have been in a specific status previously
- Example: Can't go to "Done" unless it was in "In Review" first
Setting up a validator:
- Click on a transition arrow (not the status itself)
- Click Validators on the right panel
- Click Add validator
- Choose validator type
- Configure the rules
- Critical: Write a clear error message so users know what to fix
Conditions
Conditions determine whether a transition is visible at all. If the condition isn't met, the user doesn't even see the option.
Common conditions:
Only Assignee Condition
- Only the assigned user can make this transition
- Others won't see the transition button
User is in Group Condition
- Only users in a specific group can make this transition
- Example: Only "QA Team" can transition to "QA Approved"
Permission Condition
- Only users with specific permissions can make this transition
Key difference from validators:
- Validator: User sees the button, clicks it, gets an error
- Condition: User doesn't see the button at all
Approvals (JSM Only)
As of 2026, approvals are primarily a JSM feature. Team-managed software projects have limited approval support, and company-managed software projects don't have native approvals (yet - Atlassian may expand this).
Setting up an approval:
- In a JSM workflow, add a status
- Check Include approval step
- Click Edit to configure
- Set number of approvers required
- Choose approver source (field, group, etc.)
- Define what happens when approved vs declined
- Optionally exclude reporter from approving
Typical approval flow:
Open → Waiting for Approval → [Approved] → In Progress → Done
                           → [Declined] → Cancelled
Common Workflow Sins
Sin 1: Status Explosion
Symptom: 15+ statuses that nobody can remember.
Cause: Adding statuses for every micro-step in the process.
Fix: Combine statuses. "In Review", "Review in Progress", "Under Review", and "Being Reviewed" are all the same thing. Pick one.
Sin 2: Transition Maze
Symptom: 47 transitions with cryptic names like "Move to Phase 3".
Cause: Over-engineering every possible path.
Fix: Use simplified transitions (any-to-any). Add specific transitions only when you need automation triggers or validation.
Sin 3: Approval Paralysis
Symptom: 5 approval steps for a typo fix.
Cause: Trying to enforce control that isn't needed.
Fix: Use approvals only when required (budget, compliance, etc.). Don't approval-gate everything.
Sin 4: Category Neglect
Symptom: Reports show wrong velocity, cycle time is inflated.
Cause: Statuses in wrong categories (e.g., "Waiting for Customer" marked as "In Progress").
Fix: Audit every status. Make sure categories reflect reality.
Sin 5: Resolution Confusion
Symptom: Issues show as "Done" but have no resolution set.
Cause: Workflow transitions to Done without requiring resolution.
Fix: Add a validator or post-function to set resolution on Done transition.
When Complexity is Actually OK
I've been preaching simplicity, but sometimes complexity is justified.
Legitimate reasons for more statuses/transitions:
- Compliance requirements - Regulated industries need audit trails
- Integration triggers - Status changes firing automation (e.g., deployment pipelines)
- Team handoffs - Clear delineation between Dev → QA → Release
- SLA tracking - Need to measure time in each phase accurately
- Approval requirements - Budget or security sign-offs
NOT legitimate reasons:
- "We might need it someday"
- "That's how we did it in ServiceNow/HPSM/our old tool"
- "The PM wants visibility into every micro-step"
- "More statuses = more control"
If you have a legitimate reason, document it. If you can't articulate WHY a status exists, it probably shouldn't.
Trimming Down Existing Workflows
If you've inherited a workflow nightmare, here's how to fix it.
The Reality Check
Trimming workflows is NOT simple. You need to:
- Migrate existing issues from old statuses to new ones
- Update automations that reference old statuses
- Update filters and dashboards
- Retrain users
- Handle historical data
For bulk workflow transitions, the Jira REST API can save hours of manual work.
This is why I recommend doing it in stages.
The Staged Approach
Phase 1: Audit
- List all statuses and count how many issues are in each
- Identify statuses with zero or very few issues
- Identify obvious duplicates
Phase 2: Quick Wins
- Remove statuses with zero issues (easy)
- Merge obvious duplicates (e.g., "Review" and "In Review")
- Target 2-3 status removals maximum
Phase 3: Monitor
- Watch for problems after changes
- Get feedback from users
- Make sure reports still work
Phase 4: Repeat
- Once stable, identify next set of simplifications
- Continue iterating
The One-Status-at-a-Time Rule
Don't try to go from 25 statuses to 6 in one change. You'll break things.
Remove 1-2 statuses. Wait. Fix problems. Remove 1-2 more.
It takes longer, but you'll actually succeed.
Consultant Insights
"The best workflow is the one your team actually uses correctly." A simple workflow used well beats a complex workflow used poorly.
"If I have to explain a workflow for more than 2 minutes, it's too complex." The 2-minute test is real.
"I charge clients to REMOVE complexity more often than to add it." Over-engineering is the norm, not the exception.
"Transitions should be invisible to users." If they're thinking about transitions, the workflow is fighting them.
"Most teams need 4-6 statuses, not 15." Start with 3. Add only when you have real pain.
What's Next?
If you're starting fresh:
- Create separate workflows for different issue types (bugs, epics, stories)
- Start with 3-4 statuses using simplified (any-to-any) transitions
- Add complexity only when you have evidence of problems
If you're fixing an existing mess:
- Audit your current statuses - count issues in each
- Identify quick wins (empty statuses, obvious duplicates)
- Remove in stages, not all at once
- Monitor and adjust
The goal isn't the "perfect" workflow. The goal is a workflow that's invisible - one your team uses without thinking about it.
Need help with your workflows?
- 2-hour workflow audit: I'll review your workflows live and give you a prioritized simplification plan
- Full workflow redesign sprint: 3-day intensive to audit, redesign, and implement cleaner workflows
Book a consultation →